Meet Arcadina’s new gallery management: what’s changing and where to start
We have completely redesigned gallery management in the Arcadina panel. It is now live for all customers. It is the part of the panel you use most: where you create your clients’ galleries, upload photos, set prices and manage orders and downloads. That is why we have rebuilt it to be clearer and easier to use.
In this guide you will see what has changed, where everything is now and what the first steps are. We don’t repeat the whole help centre here: each section links to the article that explains it step by step.
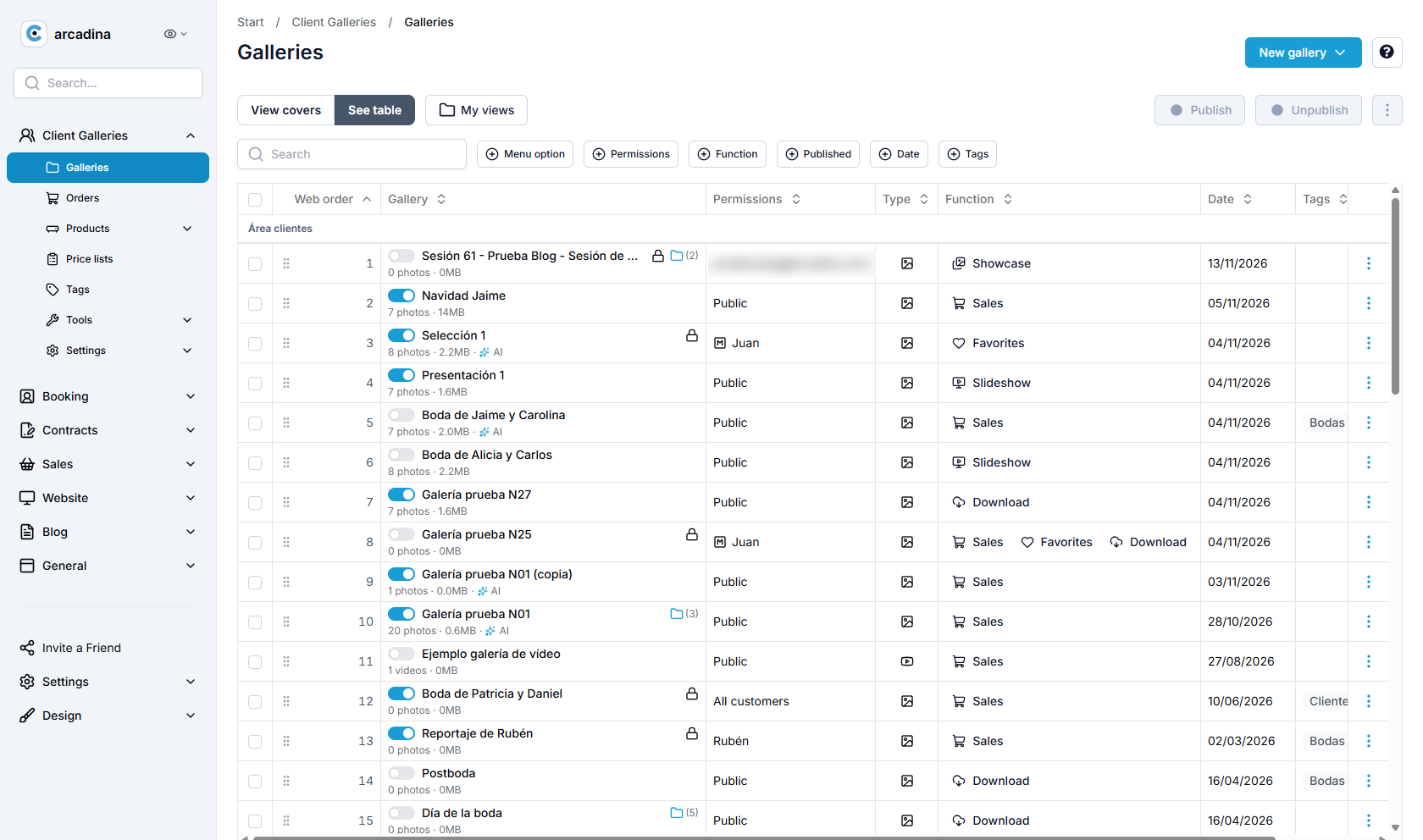
What’s changing, in short
- Creating a gallery is now a three-step wizard: General information, Permissions and Functions. The wizard only asks for what the gallery you are creating needs.
- Functions can be combined. Before, each gallery had a “mode”. Now you tick one or more functions: Favorites, Download and Sales can be combined, so a single gallery can let your client choose favourites, download photos and buy others. Showcase and Slideshow, however, always stand alone.
- Each gallery’s settings are better grouped. Everything to do with selection, downloads, sales, prices, payments and shipping is in a single tab: Functions.
- Uploading and organising photos is easier. You can drag in whole folders (each folder becomes a sub-gallery) to upload that structure to the gallery, choose whether new photos go at the beginning or the end, and replace photos with the same name.
- Each gallery shows its orders. It was one of the most requested improvements: in the gallery’s Orders tab you can see which orders include photos from that gallery.
Where everything is now
If you already used Arcadina, this table will help you quickly find what you are looking for:
| Before | Now |
|---|---|
| “+ New” button | New gallery › Create gallery (or Gallery from template) |
| “Publish new gallery” | No longer exists: galleries are created with the three-step wizard |
| Gallery mode (and the “Multiple” type) | Function: you tick one or more |
| “Parent”, to place the gallery in the menu | Menu option / Parent gallery |
| The gallery’s “Selection”, “Download” and “Sales” tabs | Functions tab, with a block for each function |
| “Permissions” tab | Permissions section of the General tab |
| “Watermarks” tab | Watermarks button in the Photos tab |
The side menu brings everything together in the Client Galleries group: Galleries, Orders, Products, Price lists, Tags, Tools (gallery templates and reminders) and Settings. Customers are still under Sales › Customers, and payment methods under Sales › Payment methods.
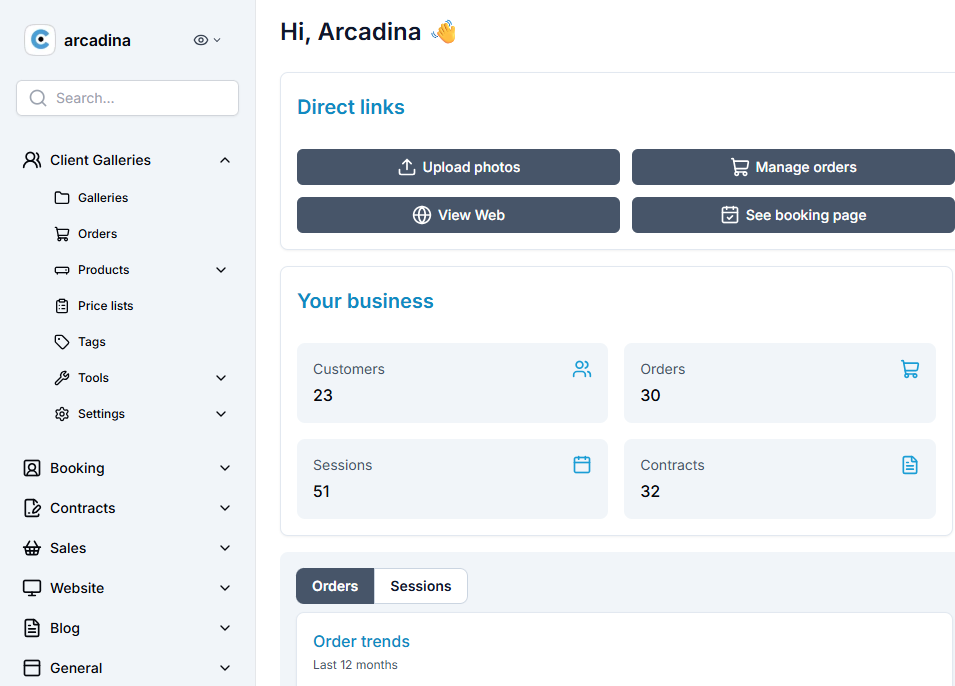
You’ll find a full tour of the menu in Getting started with client galleries.
Client galleries: showcase, selection and download
These are the private galleries where you deliver your work to clients: so they can view the photos, choose their favourites or download them.
1. Create the gallery
In Client Galleries › Galleries, click New gallery › Create gallery. In the wizard:
- General information: name, where it appears in the menu, whether it contains photos or videos and which functions it has.
- Permissions: for a private gallery, choose selected customers and tick who it is for.
- Functions: the settings for the functions you have ticked.
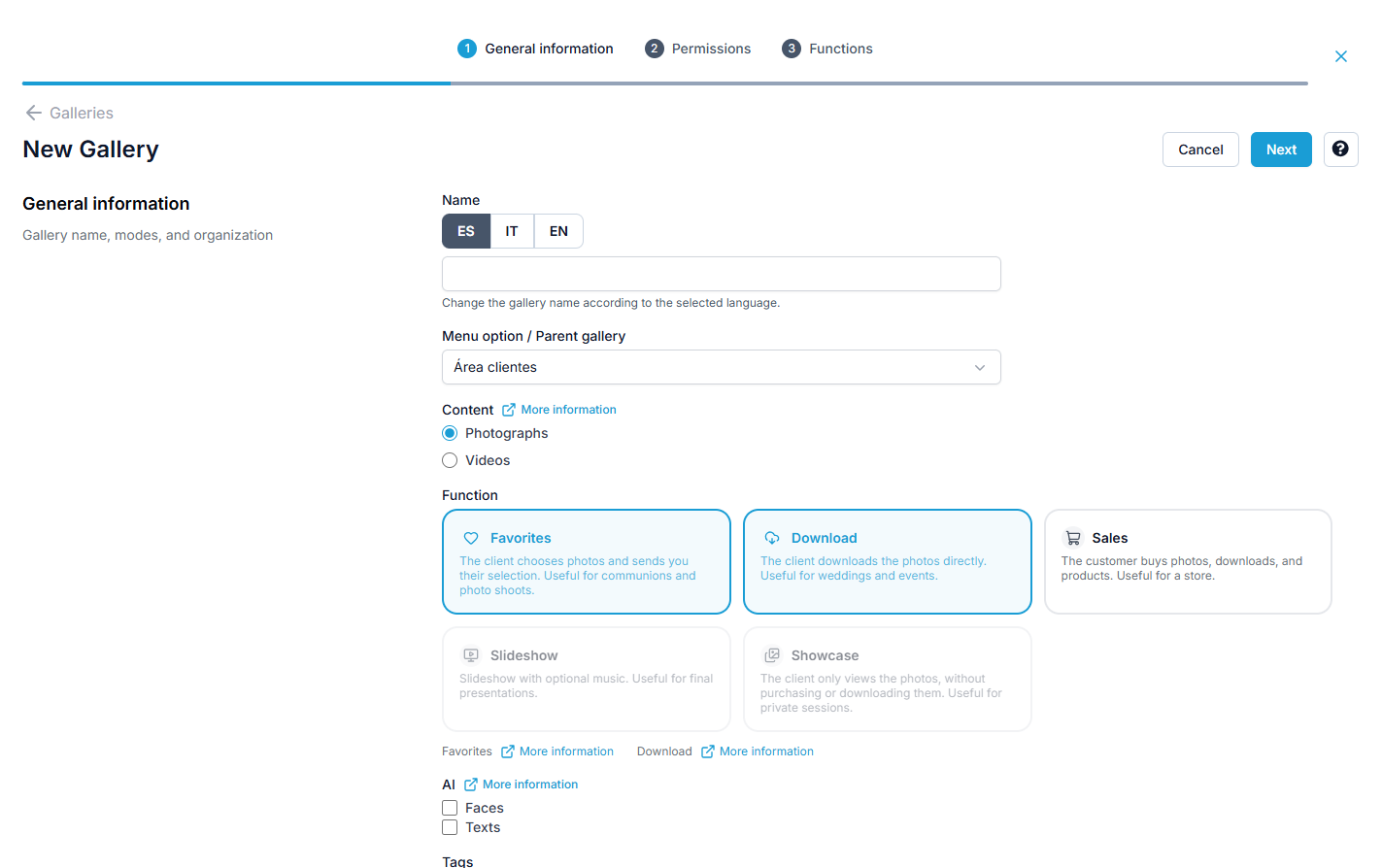
A useful rule: Favorites, Download and Sales can be combined with each other, but Showcase and Slideshow stand alone.
Step by step: Create a private gallery. If you want your client to choose their photos, see also Create a selection gallery; if they will only download them, Create a digital download gallery.
2. Upload and organise the photos
From the gallery’s Photos tab, click Upload photos and drag in photos or folders. You can then reorder them and move them between sub-galleries.
Step by step: Upload, order and organise photos in sub-galleries.
3. Send it to your client
Inside the gallery, the Send button (top right) lets you send it by email or WhatsApp, share it on social media or copy the link.
Step by step: Send login details to a customer.
4. Check the downloads
The “Download all” button and download sizes and limits are set globally in Client Galleries › Settings › Download, and can be adjusted for each gallery.
Step by step: “Download all” button and Download settings.
Tip: if you often create similar galleries, save one as a template (⋮ menu › Save as template) and create the next ones with New gallery › Gallery from template.
Selling photos: prices, digital files and orders
If you sell your photos, whether in private galleries or in a shop open to any visitor, these are the steps.
1. Set up your products and price lists
Price lists are the rates your clients see. Each list brings together the products and packs you offer with their prices, and you assign it to whichever galleries you want. That way a wedding and a school shoot can have different prices.
Step by step: Products: create, edit, categories and options and Price lists: create and set up.
2. Sell digital files in several sizes and licences
You can sell the same photo at different prices depending on size and use, personal or professional. It is very useful for sports, events or stock.
Step by step: Selling digital files in several sizes and licences. To sell the whole gallery at once: Sell a complete gallery with digital download.
3. Assign the price list to the gallery
When you create the gallery, tick the Sales function and choose the price list in the Functions › Tariff Management step. In an existing gallery, you change it in its Functions tab. Instead of a list, you can also use a catalogue specific to that gallery.
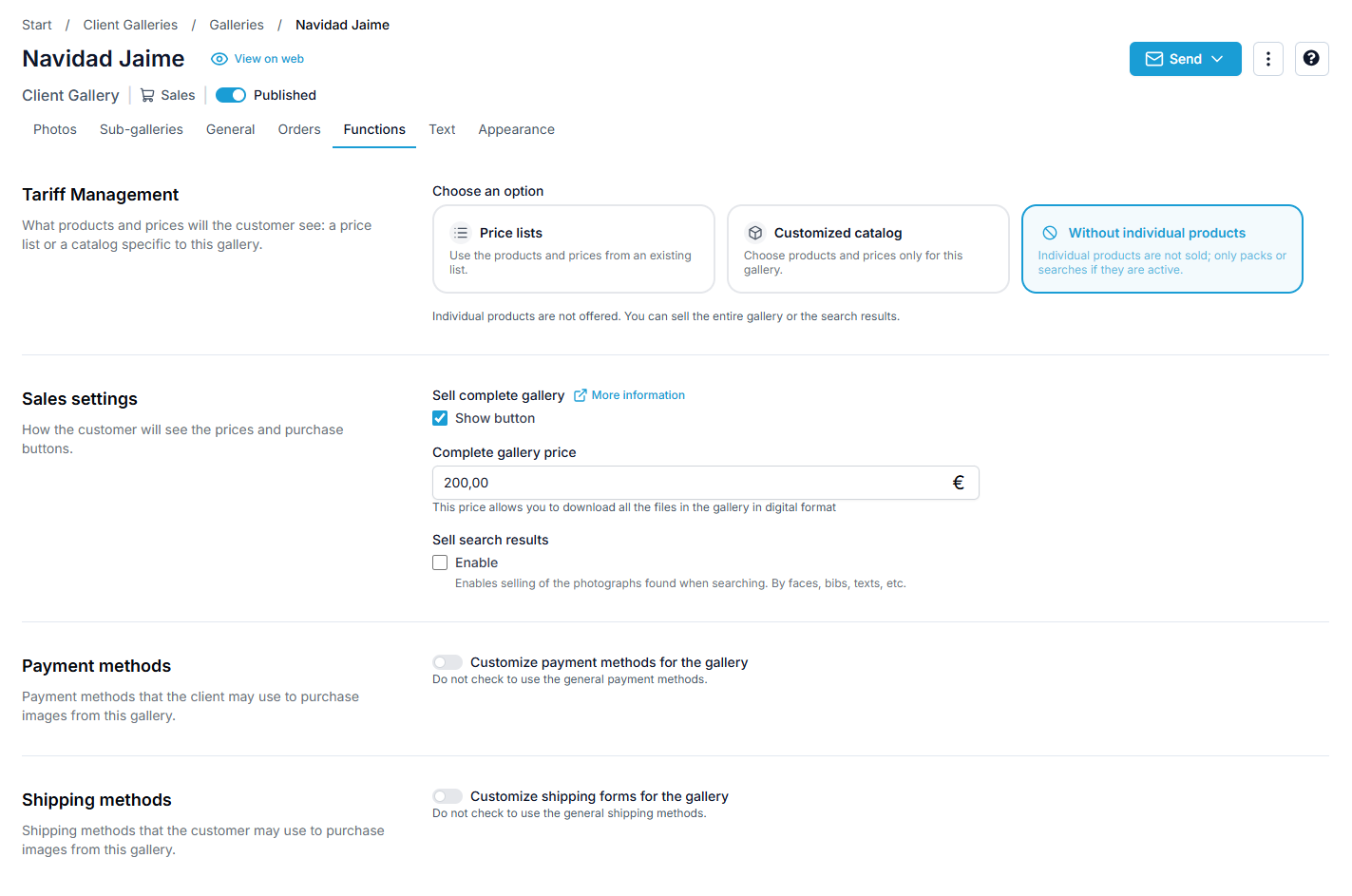
Step by step: Create and edit a digital sales gallery and, for a shop open to everyone, Create a public sales gallery.
4. Check each gallery’s orders
Inside each gallery, the Orders tab shows you the orders that include photos from that gallery, without having to search for them. To see all your orders together, filter them or change their status, go to Client Galleries › Orders.
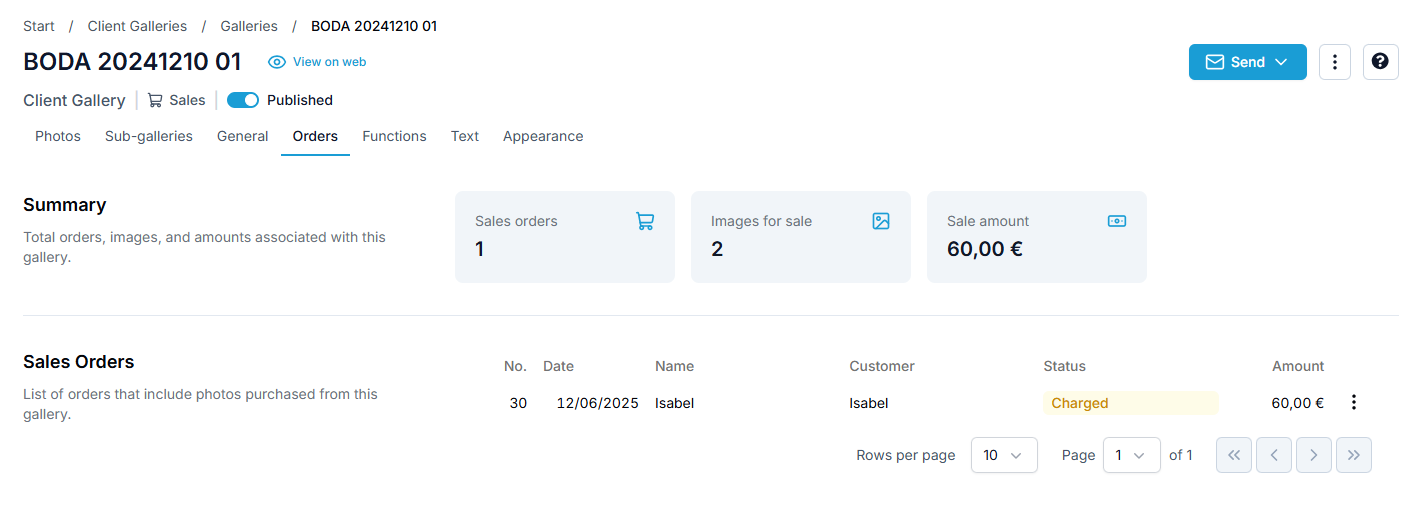
Step by step: View and filter orders, Edit an order and create the customer and Order link and manual sending.
To get paid, set up your payment methods in Sales › Payment methods: Payment methods: which to choose and how they differ.
Frequently asked questions
- Will I lose my galleries, photos or orders? No. Everything you had is still there; only the way you manage it has changed.
- Does what my clients see change? Not for now: your clients still see their galleries as before. But we are already redesigning that part too, and in a couple of weeks your clients will have new galleries that make it easier to view, choose, download and buy their photos. We’ll let you know when they are ready.
- A client has been blocked for taking screenshots. What do I do? See Unblock a customer blocked for taking screenshots.
- I can’t find a setting. General settings are in Client Galleries › Settings (General settings for galleries), and each gallery’s settings are in its General and Functions tabs.
Need help?
You’ll find all the updated articles in the Arcadina help centre. And if you get stuck, message us in the panel chat: our support team will help you with the new gallery management.
Free trial · No card · No lock-in
Build your photography business online
Sales with no commission · Everything in one plan · 30-day free trial, no card