Nature photography tips to improve your technique and take more professional photos
If you enjoy exploring the countryside, mountains or coast with your camera in tow, you know that nature photography is much more than just finding a beautiful spot and shooting. It requires planning, patience and a trained eye to anticipate the light, weather and behaviour of wildlife. In this article, we’ve put together nature photography tips and recommendations to make your outings more productive and, over time, help you develop your own style in landscape photography, animal photography and outdoor photography.
Throughout the post, we’ll talk about how to prepare your route, choose the best time of day, work on composition and take advantage of natural light to get more striking images. We’ll also look at ideas for improving sharpness, controlling exposure and getting the most out of your equipment (camera, lenses, tripod and accessories) without complicating your life. And first and foremost, an essential tip: to take high-quality nature photographs, you must do so with respect. Loving the environment, minimising your footprint, not disturbing the surroundings and keeping your distance from animals are all part of the creative process. Ethics in wildlife photography not only protect species and their habitats, they also help you capture authentic scenes, with the true essence of each landscape and every living thing that crosses your lens.
To take nature photographs and capture the power of the landscape around you, first learn to observe and feel: listen to your surroundings, wait for the right moment and shoot with intention.
Nature photography guide and tips for choosing your speciality
Nature photography is about documenting and reinterpreting the natural world in its most authentic state: from a vast landscape at sunrise to wildlife, flora or seemingly ‘inanimate’ details that come to life with the right light and season (e.g. an autumn hillside or the texture of rocks after rain). Beyond ‘taking pretty pictures’, it involves observing, anticipating and recounting what is happening in the environment with intention and respect.
Today, nature photographers also tend to specialise more and more. This not only helps them develop their own style, but also improve their technique and equipment according to the type of scene: photographing birds in flight is not the same as working on a macro shot of insects or a night shot in the mountains. That is why, within outdoor photography, very specific disciplines have been gaining importance, such as:
- Landscape photography.
- Wildlife photography (native species, behaviour, action).
- Bird photography (perched and in flight).
- Flora photography.
- Night photography and astronomical photography.
- Underwater photography.
- Macro photography (nature and insects).
- Still life in natural surroundings.
- Aerial photography of natural environments (drone).
And yes, there are many more variants (weather, auroras, time-lapse, abstract, etc.), and new ways of looking will continue to emerge because the planet is full of unique phenomena and moments.
Below, we will take a closer look at some of these specialities and, above all, what nature photography tips you can apply to get started in each of them.
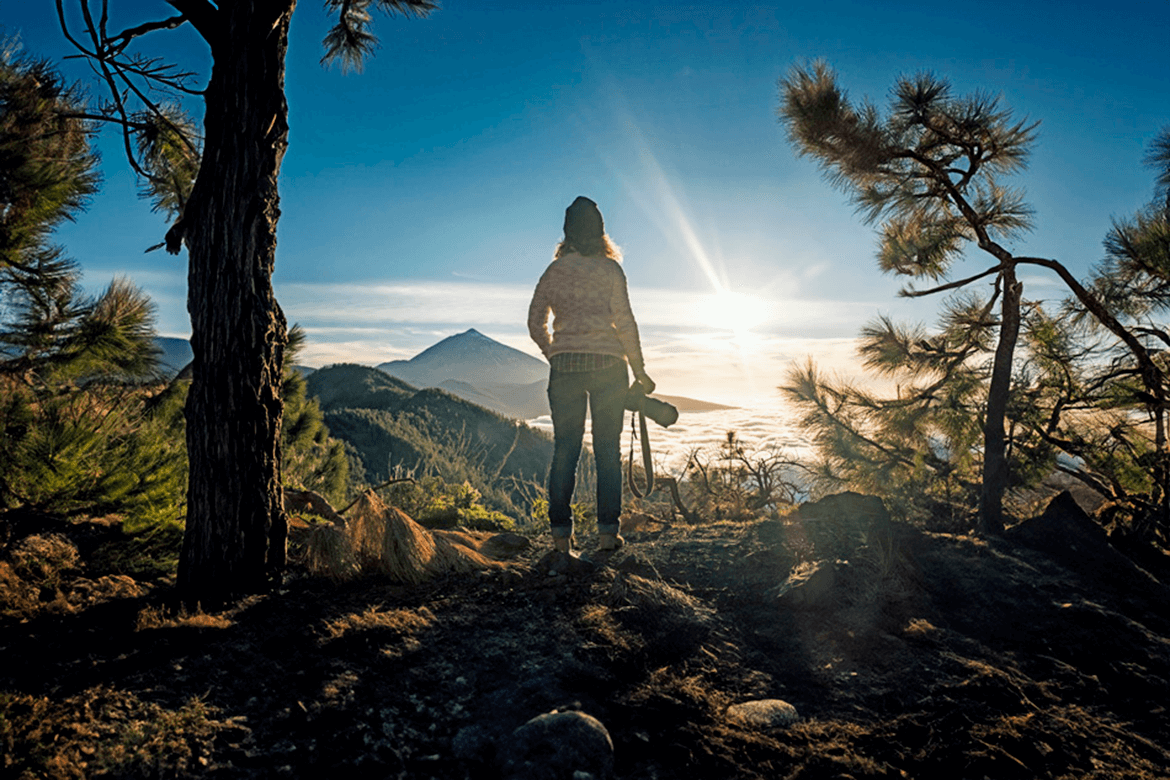
Landscape photography: keys to capturing natural scenes with impact
Within nature photography, landscape photography is usually one of the most popular specialities, along with wildlife photography. And it’s no coincidence: working with natural settings forces you to plan, observe and make technical decisions that make the difference between a good image and a truly memorable photograph.
To begin with, it is essential to choose the right season and time of day. Light completely changes an environment: sunrise and sunset provide volume, texture and soft contrast, while the harsh light of midday requires more exposure control. Added to this is the weather. Clouds, fog, rain or wind can become your best allies if you anticipate them and adapt your approach. That’s why one of the best tips for nature photography is to prepare your outing in advance: check the forecast, the sun’s orientation and access points, and decide what story you want to tell with that location.
The point of view is also crucial. The same location can offer very different images depending on the angle, the height of the camera and the elements you include in the foreground. Ideally, you should visit the location beforehand (or arrive early) to explore routes, frames and possible compositions. Look for lines that guide the eye, balance the horizon and take advantage of depth with near and far planes.
With this foundation, your outdoor photography reports will gain consistency, and you will begin to master light and composition in every scene.
Wildlife photography: how to capture animals in their natural habitat
Wildlife photography is one of the most demanding branches of nature photography, because the goal is to portray wild animals in their habitat without altering their behaviour. Here, technique is important, but what makes the most difference is preparation: knowing the species, their routines and the environment where they live.
Before heading out into the field, it is a good idea to study their natural cycles (mating season, migration, breeding), their activity schedules and signs of their presence. It also helps to familiarise yourself with the terrain: paths, watering holes, feeding and reas, burrows or nests. Reading the landscape will allow you to anticipate and choose safe locations from which to work discreetly. A good piece of advice for wildlife photography is to always prioritise ethics: keep your distance, do not use inappropriate lures, do not approach young animals or block their paths.
As for the type of images, you can look for action scenes (flight, hunting, running), more intimate moments (resting, social interaction) or behavioural photographs (feeding, caring for young). Unlike landscape photography, here you don’t control the scene: animals are unpredictable and any intervention breaks the natural flow. That’s why patience and silence are part of the ‘equipment’.
Working with a telephoto lens, a high speed to freeze movement and continuous focus is usually the norm, but the key is to adapt to each situation. If you learn to observe and wait, your wildlife reports will gain authenticity and you will tell more powerful stories in outdoor photography.
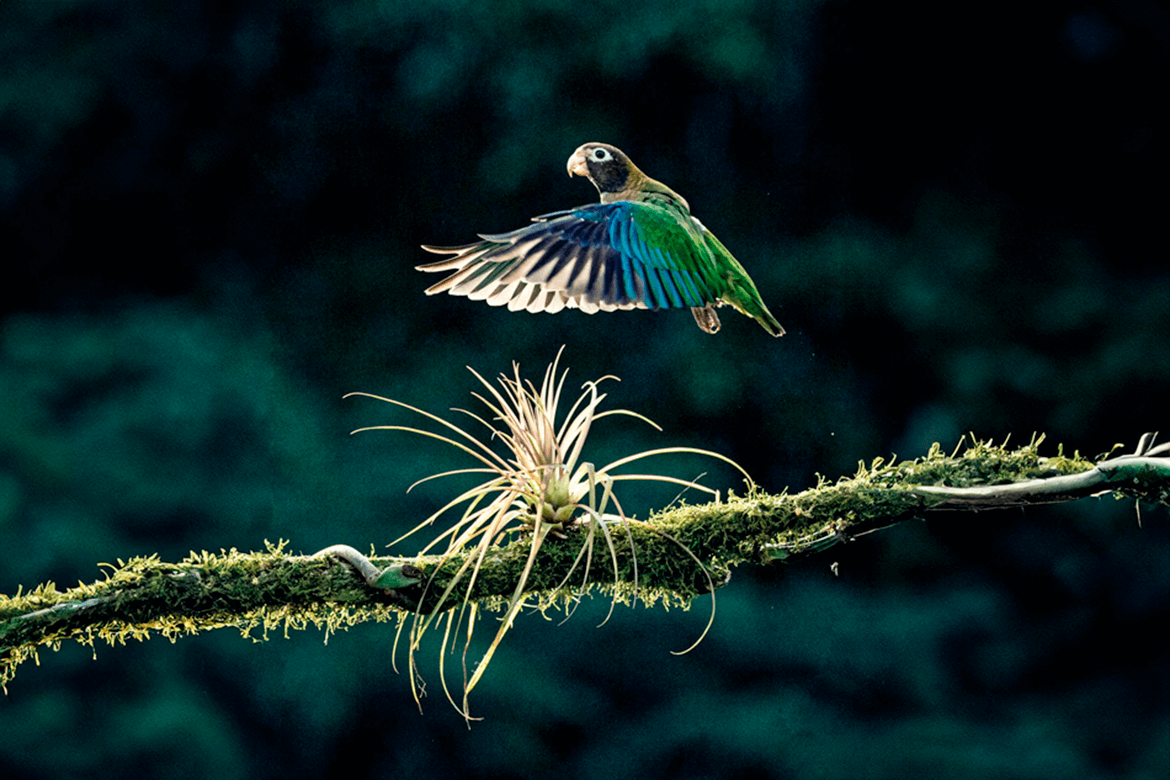
Bird photography: keys to capturing their behaviour in flight and at rest
Bird photography is considered part of wildlife photography, but the hobby of birdwatching and the number of specific techniques it requires mean that it deserves its own section within nature photography. Here, preparation begins long before you take out your camera: identifying species, learning about their habits and understanding their migratory routes and schedules.
To increase your chances, it is a good idea to study which birds frequent your area, when they appear and which ecosystems they visit: wetlands, riverbanks, marshes, forests or agricultural areas. Water points, feeding areas and regular roosting places are usually key locations for planning outdoor photography sessions. It also helps to learn to read behaviour: signs before take-off, flight patterns, breeding territories or times of greatest activity (early and late hours of the day).
In this discipline, patience is a must. Often the best photo comes after long periods of waiting, when the bird gets used to your presence or approaches naturally. That’s why one of the most important nature photography tips here is to minimise your impact: move slowly, avoid noise, respect distances and don’t force situations, especially during breeding season.
Camouflage and discretion make all the difference. Neutral clothing, hiding behind vegetation or using a hide can help you capture authentic scenes. This will allow you to take pictures of birds both at rest and in action: flying, landing, hunting, interacting or feeding, always with a respectful and realistic approach.
Flora photography: how to capture flowers and plants in detail and naturally
In flora photography, the aim is to portray the plant world with a more intimate approach, showing texture, colour and shape with a higher level of detail than in a general landscape. This includes everything from flowers and leaves to ferns, mosses, bark, seeds and small shrubs. It is a very rewarding speciality within nature photography, because it allows you to be creative even close to home if you know how to observe.
Planning is also important. Knowing the flowering season, the cycles of each species and the places where they grow (forests, meadows, dunes, riverbanks or high mountains) will help you find scenes at their best. In addition, light is crucial: cloudy days, open shade or the early hours of the day usually offer soft lighting and more accurate colours, ideal for avoiding harsh glare and excessive contrast.
On a technical level, playing with focal length and depth of field sets the style. A macro or bright lens allows you to isolate the subject with blurred backgrounds, while closing the aperture can give you sharper details and structures. Pay attention to the angle too: getting down to ground level, looking for backlighting or using a clean background can completely transform the image. If it is windy, stabilising yourself with a tripod and protecting the plant with your own body (without touching it) is good nature photography advice for maintaining sharpness.
Finally, always prioritise respect for the environment: do not pick flowers or tread on sensitive areas. The best outdoor photography is that which leaves the place exactly as you found it.
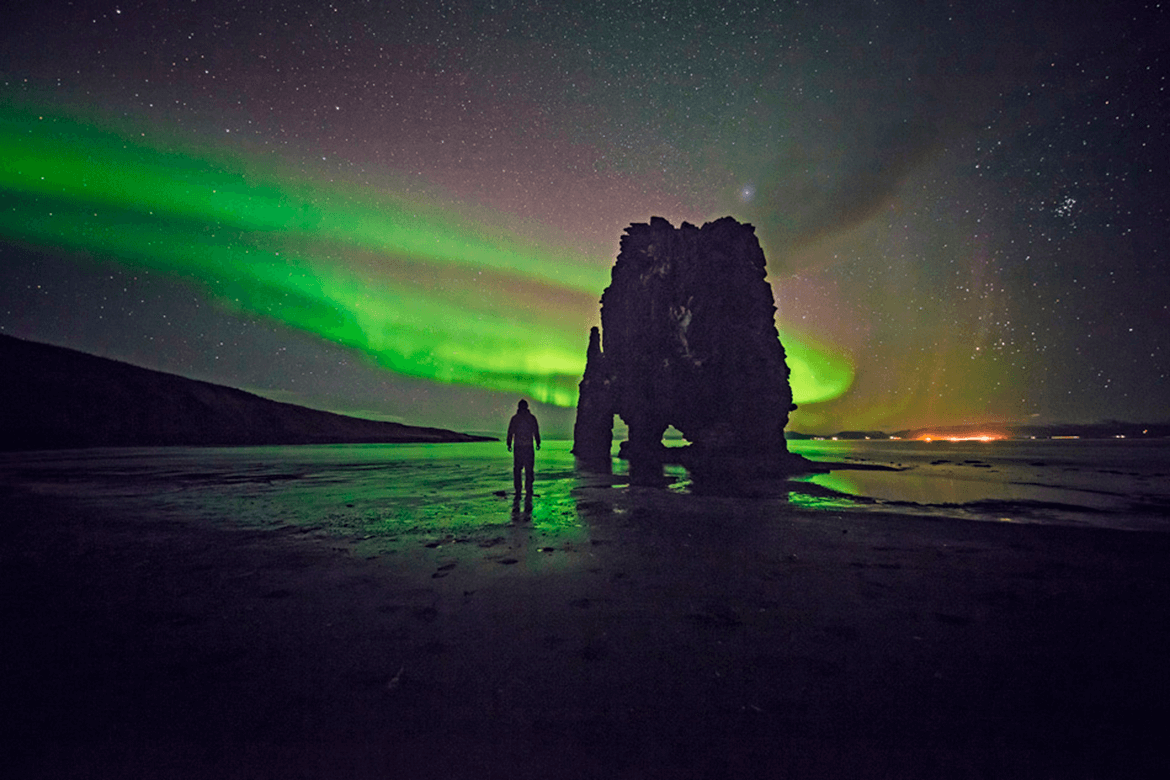
Night photography in nature: keys to capturing skies and landscapes with atmosphere
Night photography combines landscape and astronomical photography to create a unique and surprising scene, with the help of other phenomena such as the phases of the moon, a thunderstorm, a meteor shower, etc.
To take this type of image, it is important to know the environment in which you are going to take the photos, visit it in broad daylight so you don’t get any unpleasant surprises on the day of the shoot, and always look for a high, clear spot free of artificial light so you can capture the infinite beauty of the night sky.
In short, night photography is about knowing how to wait for the right moment and playing with light and shadow to capture true works of art in the natural environment.
Astronomical photography: tips for accurately capturing the Milky Way and the night sky
Astronomical photography is one of the most fascinating disciplines within night photography and nature photography, because it allows you to portray the celestial vault and phenomena that only occur at specific times. In this type of photography, you can look for everything from wide scenes with the Milky Way and constellations to specific events such as meteor showers, comets, moon phases, eclipses or conjunctions in which the silhouette of a planet appears.
Planning is key. To get a clear sky, you need to get away from light pollution, choose a location with a clear horizon, and check the forecast for clouds and humidity. It’s also a good idea to take the moon phase into account: a very bright moon can ‘erase’ stars, while in other situations it can be useful for illuminating the landscape and creating a more balanced scene between sky and earth.
On a technical level, mastering long exposure makes all the difference, but it’s not just about ‘exposing more’. One of the best nature photography tips for astronomy is to work with stability and precision: a sturdy tripod, well-adjusted manual focus, remote shutter release or timer, and in-camera noise control. In addition, learning basic astronomy concepts (orientation, height of the Milky Way, rise and set times) will help you arrive at the location with a clear idea of framing and timing.
Finally, don’t forget the composition component: including a foreground (trees, mountains, rock formations) adds scale and narrative. This will turn a photo of stars into a night-time image with atmosphere and personality.
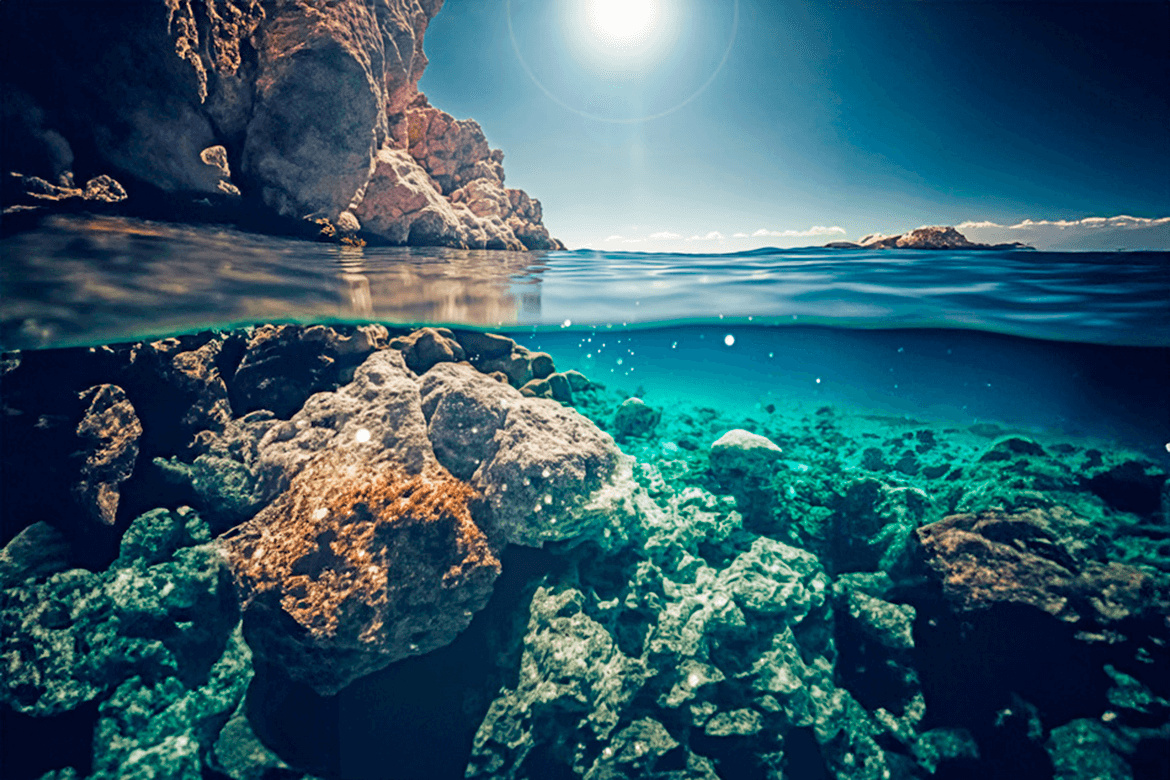
Underwater photography: tips for safely capturing marine life and underwater landscapes
Underwater photography is probably the speciality that requires the most preparation and equipment in nature photography. Underwater, you can photograph marine life, flora, underwater textures, caves, posidonia meadows or more creative scenes with wrecks and objects on the seabed (always respecting regulations and heritage). The challenge is twofold: in addition to photographic technique, you have to deal with less light, colours that fade with depth and changing conditions in terms of currents and visibility.
To begin with, it is essential to have the right equipment: a waterproof housing or specific equipment, appropriate lenses (wide angle for seascapes, macro for small organisms) and a secure mounting system. If you want to work at greater depths or recover colour and detail, artificial lighting (flashes or spotlights) becomes key. Here, one of the best tips for nature photography is to learn how to balance ambient light and artificial light to avoid green or blue casts and achieve more natural tones.
Planning also makes a difference. Familiarise yourself with the area before diving: entry and exit points, tides, currents, depth, possible risks and the presence of species. If you can, coordinate with local diving centres or guides, especially in new locations.
And, above all, safety and ethics. Mastering buoyancy, moving without stirring up sediment and keeping your distance from animals is essential to avoid damaging the ecosystem or spoiling the scene. If you are still inexperienced, taking a diving course and practising first in controlled conditions will make your outdoor photography (in this case, underwater) much safer and more satisfying.
Macro photography in nature: tips for capturing small details with maximum sharpness
Macro photography is one of the most technical and creative branches of nature photography. It allows you to get closer to a world invisible to the naked eye: insects, small amphibians, details of flowers, leaf textures, dewdrops, fungi, or even microscopic structures if you work with specific techniques. In addition to being very impressive, in some cases macro photography is used for educational or scientific purposes, for example in biology studies and species documentation.
It is also a discipline with a strong artistic component. By isolating shapes, patterns and colours, many macro images enter a more abstract realm, where composition and light control are as important as the subject. Therefore, one of the best nature photography tips for macro is to learn to simplify the frame: clean backgrounds, good focus point and a clear intention.
On a technical level, a macro lens makes it easier to capture real detail, but it’s not the only way: extension tubes, close-up lenses or reverse rings can help you get started. Of course, in macro photography, depth of field is minimal, so stability becomes critical. A tripod or good hand- , along with a remote shutter release or timer, greatly improves sharpness. If the subject is moving (wind or insects), you will need to increase the shutter speed and adjust the ISO accordingly.
Lighting is also crucial. Take advantage of soft shadows or cloudy days to avoid glare, and if you use artificial light, look for diffused lighting to maintain a natural look. With patience, observation and practice, your outdoor photography sessions will gain precision and style.
Outdoor still life: how to create atmospheric and detailed images in natural environments
Outdoor still life is a very creative aspect of nature photography. Here, the focus is not on wildlife or grand landscapes, but on inanimate elements found in the environment: fallen leaves, branches, stones, seeds, logs, shells, ice, footprints, or small scenes created by the action of time itself. The approach is usually more artistic, because the aim is to construct an image with intention: to convey an idea, an emotion or an atmosphere through composition, light and texture.
One of the keys is learning to ‘see’ what others overlook. Changing the scale, getting closer and isolating details turns a walk into a search for shapes and patterns. In addition, the seasons play an important role: the colours of autumn, the humidity of winter, the flowers of spring or the dryness of summer can completely transform the visual tone of your outdoor photographs.
Although this is a type of spontaneous photography, it is a good idea to apply some very specific nature photography tips: pay attention to the order of the frame, simplify the background, look for lines and repetitions, and work with side lighting to highlight relief. If the subject allows it, varying the point of view (at ground level or from above) completely changes the reading of the scene. A tripod can help you refine the composition and maintain sharpness if you are using low light.
You can also enhance the artistic character in editing, but without losing naturalness: adjusting contrast, white balance and micro-detail is usually enough to enhance textures and atmosphere. This will give you images with their own identity, even without leaving the ‘detail’ of the landscape.
Aerial nature photography: tips for capturing landscapes from the air with a new perspective
Aerial photography has transformed the way we understand nature photography. By raising the viewpoint, the landscape becomes a visual map of shapes, lines and patterns: meanders, dunes, cliffs, forests or crops take on a more abstract and spectacular interpretation. It is a powerful tool for landscape photography and for creating images with a strong aesthetic impact.
Historically, aerial photography was developed for military, topographical and scientific purposes. Many shots were taken from aeroplanes and then analysed to study the terrain using photogrammetry, improving knowledge of geography and infrastructure planning. Today, technology has democratised this approach: with a drone, it is possible to access perspectives previously reserved for costly productions and capture outdoor photography scenes with a completely different narrative.
Even so, it’s not all “point and shoot”. One of the best tips for nature photography using drones is to plan the shot as if it were a route: check the light (sunrise and sunset are usually the best times), study the wind and look for compositions based on geometry, symmetry or colour contrasts. It is also important to work with height intentionally: sometimes a relatively low shot provides more depth than a shot that is too high.
And, of course, the legal and safety aspects are essential. To fly drones, you must comply with current regulations, know the airspace in the area, check for restrictions (nature reserves, populated areas, airports) and fly responsibly. This will ensure that your aerial photographs are more creative, safer and more respectful of the environment.
Want to take better photos? Nature photography tips to take your images to the next level
To apply nature photography tips with a more professional approach, it is not enough to simply carry “more equipment”: the important thing is to choose the right equipment for the location, the light and the type of outdoor photography you are going to do (landscape, wildlife, macro, night or drone). A good kit improves results, but also comfort and safety in the field.
Recommended essentials for your next outing:
- Camera and, if necessary, specific equipment (e.g. housing for underwater or aquatic photography).
- Lenses according to speciality: wide angle for landscape photography, telephoto for wildlife and bird photography, macro for details.
- Stable tripod with ball head and remote shutter release or timer.
- Filters: polariser, neutral density and graduated to control reflections and exposure.
- Auxiliary lighting: flash or continuous light (with diffuser) for macro or specific scenes.
- Useful accessories: lens hood, monopod, spirit level, GPS, binoculars, hide and camouflage clothing if you are photographing wildlife.
- Consumables and safety: extra cards and batteries, cleaning kit, comfortable rucksack, rain cover, head torch, raincoat, water and food.
Before packing your rucksack, define the objective of the session and plan your route: this will help you avoid unnecessary weight and ensure you arrive at your shooting location with plenty of energy. This is one of the most practical nature photography tips: the clearer you are about what you are going to photograph, the more efficient your equipment and your time will be.
Finally, check the weather forecast and the best times for light. It’s not just about avoiding ‘bad weather’: sometimes fog or clouds add atmosphere, but it’s good to know this and be prepared.
Extra nature photography tips for creating high-impact reports
The first photographers who ventured into nature photography sought, above all, to show little-known wild territories or to document fauna and flora with a scientific approach. Today, in addition to its artistic value, this discipline has become a visual language that is very present in social media and the media, as well as a powerful tool for connecting the public with the natural environment.
In a context of greater sensitivity to climate change and biodiversity loss, outdoor images can help to reinforce environmental awareness and respect for ecosystems. Of course, beyond the message, if you want to elevate your work, you need method, technique and a clear intention behind each outing.
Here are some extra nature photography tips to improve the quality of your reports:
- Adjust the aperture according to the subject: shallow depth of field to isolate the subject (fauna, flora, macro) or more closed for detailed landscapes.
- Control the ISO judiciously: prioritise quality, but don’t be afraid to increase it if you need speed.
- Plan for light and weather: check the forecast, clouds, wind, humidity and the sun’s orientation to arrive with your frame in mind.
- Study species and behaviour if you are photographing wildlife or birds: activity times, migration routes and warning signs.
- Work on perspectives and layers in landscape photography: foreground, middle ground and background to create depth.
- Prepare your equipment and backpack in advance: charged batteries, memory cards, basic cleaning and protection against rain or dust.
- Practise patience: waiting for the right moment is often the difference between a decent photo and a memorable image.
And last but not least: photograph ethically. Do not disturb the environment, keep your distance and leave each place as you found it. Your work will gain authenticity and the landscape will still be there for the next light.
Nature photography recommendations for photographing flora and plants in detail and naturally
To get started in nature photography, you don’t need to go far from day one. A good strategy is to practise close to home with accessible subjects: flowers, plants, shrubs, leaf textures or small details in parks and paths. This way you can practise composition, focus and light control without having to travel far. Once you gain confidence, you can plan longer trips to combine flora photography with landscape photography and wilder scenes.
When it comes to logistics, preparation makes all the difference. Outdoor photography requires you to be comfortable and safe: hiking boots, layered clothing, protection from rain or wind, and enough water. It’s also a good idea to carry the essentials in a lightweight rucksack (batteries, memory cards, cleaning cloth, rain cover for the camera) and adapt your equipment to the type of session: a macro or bright lens for details, or a wide-angle lens if your goal is landscape photography.
Another key point in nature photography tips is to know the terrain. Check routes, slopes and daylight hours, and don’t take risks in unfamiliar areas without planning: an offline map, GPS or a track can prevent unpleasant surprises. If you are going alone, inform someone of your route and your estimated time of return.
And yes, photographing nature is much more challenging than a studio session, because the light changes, the weather dictates and the environment is beyond your control. But that’s where the value lies: the better you prepare, the more chances you’ll have of coming back with powerful images and, what’s more, a much more enjoyable experience.
Nature photography tips for capturing animals with your camera without disturbing their behaviour
If you are just starting out with animal photography, a good way to practise is to do so in controlled environments where you can focus on technique: continuous focus, high speed, light metering and subject tracking. A zoo can be useful for your first attempts, especially for learning how to compose and react quickly, although it is important to be aware of its limitations (artificial backgrounds, reflections in glass and less natural behaviour).
If you prefer an approach closer to wildlife photography, look for alternatives where animals are in large spaces or semi-freedom, or where conservation is the priority. For example, parks and protected areas, reserves, interpretation centres and observatories, or even guided activities with professionals. In the UK, you can find inspiration in places such as Cabárceno Nature Park (Northumberland), Doñana (Huelva), Cabañeros National Park (Ciudad Real) or Molló Parc (Girona), among others.
In any case, apply these nature photography tips: keep your distance, do not interfere with their behaviour, avoid noise and sudden movements, and respect the rules of the place. This way, in addition to improving your outdoor photography technique, you will begin to develop a more authentic and responsible style of nature photography.
Nature photography tips: listen to your surroundings, observe calmly and shoot with intention
Now you have a solid foundation of nature photography tips to take your outdoor shoots to the next level. The key is to try different styles of nature photography (landscape photography, wildlife photography, bird photography, macro photography, night photography, or even aerial photography) and discover which one connects with you best. When you find your speciality, it’s also easier to build a coherent portfolio, improve your technique, and set yourself apart.
To make steady progress, plan each session in detail: check the light and weather conditions, study the location, prepare your equipment according to the type of outdoor photography you are going to do, and leave room for improvisation. And, of course, always work with respect: do not disturb the environment, keep your distance from animals, and leave the place as you found it. This ethic is reflected in the results and reinforces your reputation as a professional.
If your goal is to go beyond being an amateur and start making money from your work, think about the whole process: how you present your images, how you deliver them, and how you convert visitors into customers.
At Arcadina, we offer you tools to create a professional online presence and manage your photography business with a polished experience, from your portfolio to the delivery and sale of your photographs.
If you haven’t tried our solutions yet, you can do so for free for 14 days and see how they can help you take your nature photography to the next level.
On this occasion, we would like to share with you an interview with nature photographer, trainer, long-time friend and new Arcadina ambassador Joan Vendrell.
>> Meet Joan Vendrell, Arcadina’s new ambassador
And to say goodbye, we would like to conduct a survey among landscape, flora and fauna photographers. Which disciplines of nature photography do you identify with most? We look forward to reading your comments.
Arcadina goes with you
Fulfil your dreams and develop your career with us. We offer you to try our web service free for 14 days. And with no commitment of permanence.
Arcadina is much more than a website, it is business solutions for photographers.
If you have any queries, our Customer Service Team is always ready to help you 24 hours a day, 7 days a week. We listen to you.


The point about “waiting for the right light” is so true—it’s the one thing you can’t shortcut in nature photography. I’ve spent way too many hours chasing that perfect golden hour glow only to realize that patience is actually the most important tool in the kit. Lately, I’ve been trying to bring that same eye for detail and natural light back into my indoor environment, especially since I do so much post-processing at home now. Thanks for the reminder to slow down and really observe the textures around us!