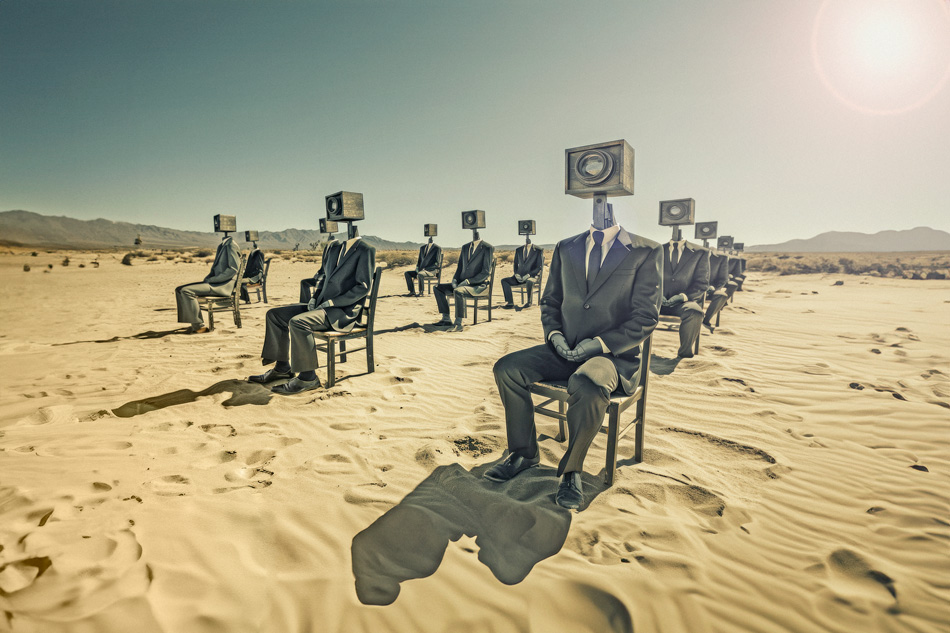
AI applied to photography: Tools to turn artificial intelligence into an ally
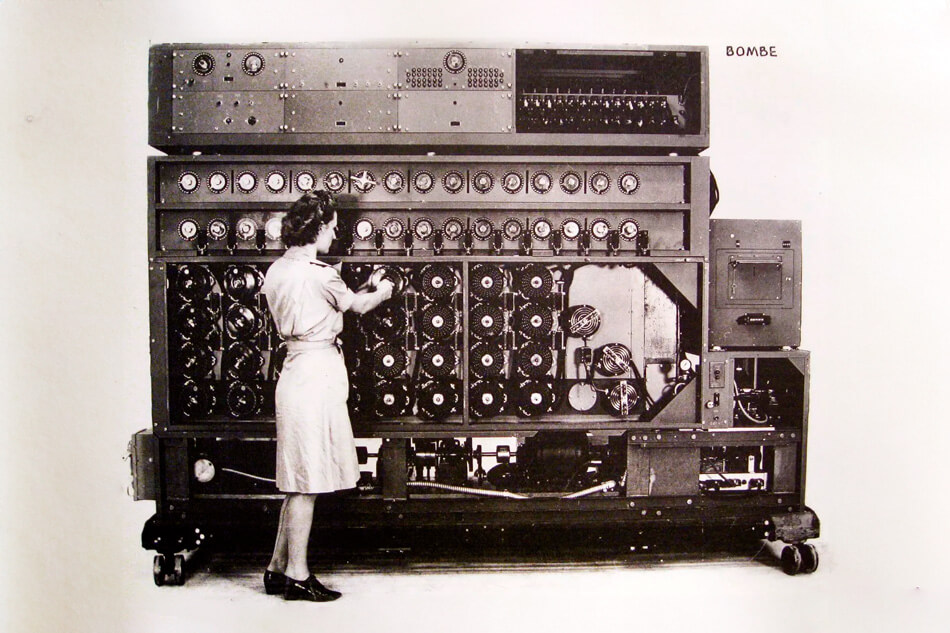
It has been a year since I wrote my first article in this blog about artificial intelligence and the impact it was going to have on the photography sector, both creatively and professionally. And the fact is that AI has ceased to be that recurring innovation that in the collective imagination has had so many forms arising from cinema or science fiction literature to become a feasible reality that, until very recently, nobody expected. And this, despite the fact that the first sketch of an artificial intelligence dates back to 1939, when the English mathematician Alan Turing devised Bombe, the calculating machine with which it was possible to decipher the Nazi Enigma codes, with enough time to anticipate the Reich’s movements during the Second World War.
The first sketch of an artificial intelligence dates back to 1939, when the English mathematician
Alan Turing devised
Bombe, the calculating machine with which it was possible to decipher the Nazi Enigma codes.
And so, while HAL 9000 rebelled against humans in 2001, A Space Odyssey (Stanley Kubrick, 1968) or Rick Deckard in Blade Runner (Ridley Scott, 1982) hunted replicants endowed with an emotional intelligence not much more developed than that of the super-toy child in A.I. Artificial Intelligence (Steven Spielberg, 2001), in the real world Eliza (1966) was born, the first programme based on the idea of artificial neural networks, a supercomputer called Deep Blue defeated the world chess champion Gary Kasparov (1996), and AlphaGo (2015) and AlphaZero (2017) took a giant step forward, being the first known programmes capable of learning by themselves.
All these events, at the time, had no more impact on the collective consciousness than that of a filler news item on any news programme or a La 2 documentary on science and technology, as long as one did not end up nodding off to the voice of Eduard Punset in the background. And despite the fact that all the knowledge there is and ever will be is available to anyone thanks to the Internet, the vast majority of non-artificial intelligences seem to be opting to use the technological fact to peel the turkey on the RRSS, totally oblivious to the evolution of events that are the prelude to a paradigm shift that is undoubtedly going to turn everything upside down.
And AI is here to stay…
Already in 2024, you don’t have to look back very far to find a succession of events, in a really short timeline, after which artificial intelligence has ceased to be an alien concept for the average citizen to become a “something” sufficiently relevant-stimulating-concerning-fill in the dotted line…, so that many of us can’t get it out of our heads. The coup on the table was delivered by OpenAI in 2019, with the launch of version 2 of ChatGPT, an artificial intelligence chatbot application, trained at the time from 1.5 billion parameters and 8 million web pages and which, just 4 years down the line, now has 100 trillion parameters and a data volume of over a million Gigabytes.
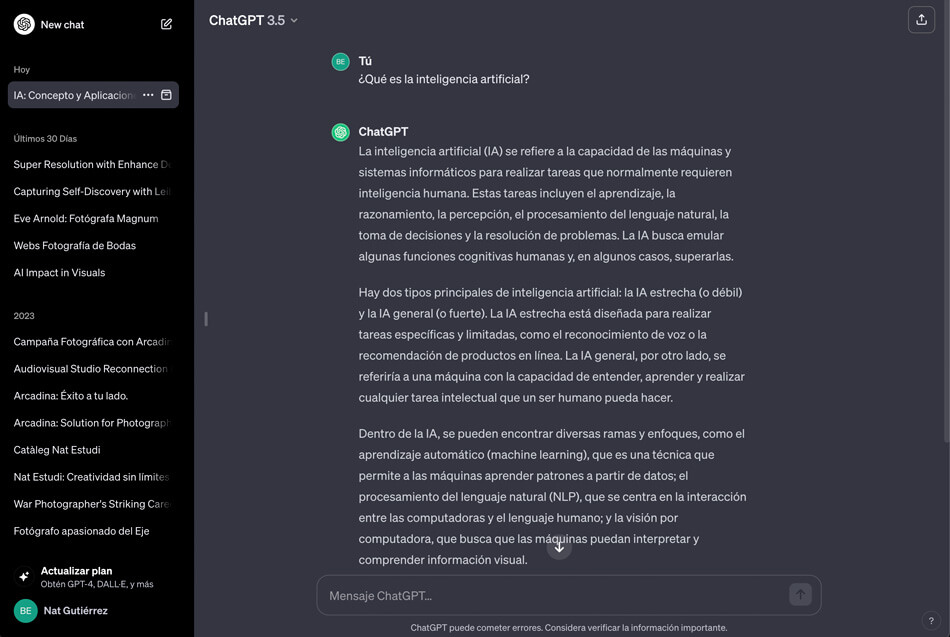
Interface of the free version of ChatGPT.
But if there was a specific moment that put photographers, designers, illustrators, graphic and audiovisual artists, etc., on their guard, it was in April 2022, when the image of an astronaut on horseback riding through the sky began to circulate in the media all over the world. That sort of realistic-looking photo-illustration was generated by DALL-E 2, an artificial intelligence also created by OpenAI, capable of generating graphic content from a mere text explanation, what we know today as a prompt. Suddenly we were faced with the evidence that an AI could be creative and emulate any image production process with the difference that, what for a photographer or illustrator would imply hours of work or a large amount of human and technical resources, this one was capable of reaching a result in a few seconds, without the complexity or not of the instructions given through the prompt affecting its processing speed at all.
And if this already had an impact, at least among those of us who were already beginning to see artificial intelligence as something to be taken into account, in July of the same year the first open beta version was launched of what is undoubtedly the AI that has caused a stir in the audiovisual and artistic sectors. I am talking about Midjourney, the most advanced artificial intelligence that exists openly at the moment to generate image content from prompts, to such an extent that, today, it is practically impossible to differentiate the images generated by the AI from those obtained with any audiovisual creation and production process without AI, with such fascinating and plausible results that, without a doubt, we can already state, without getting our fingers caught in the door, that the capacity of an AI to convert a briefing into a final visual finish is increasingly close to surpassing that of human capacity itself.
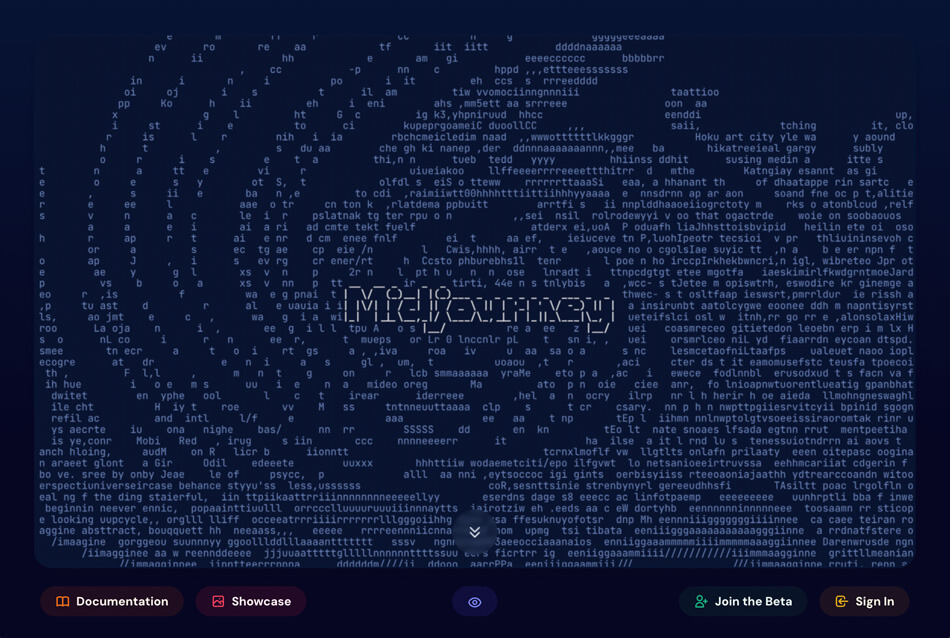
Midjourney homepage.
It is quite difficult to find a precedent, either in the industrial revolution or in the subsequent technological and digital revolutions, for such a dizzying pace of development that encompasses so many possibilities, present and future…
In fact, part of the research and learning that many of us who have begun to introduce AI into our creative processes, after years of living through the technological evolution, not without digesting many internal controversies, is based on creating the unmanageable, that is, that which until now was only viable in the imagination of each individual and impossible to reproduce due to the limitations of production in the real world.
And the speed at which all this is happening is overwhelming. In fact, it is quite difficult to find a precedent, neither in the industrial revolution nor in the subsequent technological and digital revolutions, of such a vertiginous pace of development that encompasses so many possibilities, present and future, in practically every field that one can think of. Because we are going to focus on the audiovisual sector, which is the one that concerns us through the content of this blog, but it is really overwhelming to try to process everything that is already happening, and everything that is yet to come, in other fields as disparate as science, medicine, journalism, music or finance. And let my more modest experience serve as an example of that speed: the originals of the following images, which we could call the RAWs of AI, were created with Midjourney with a prompt of very similar textual characteristics, but less than a year apart from each other; the first image is the result I obtained in January 2023; the second is from August of the same year.
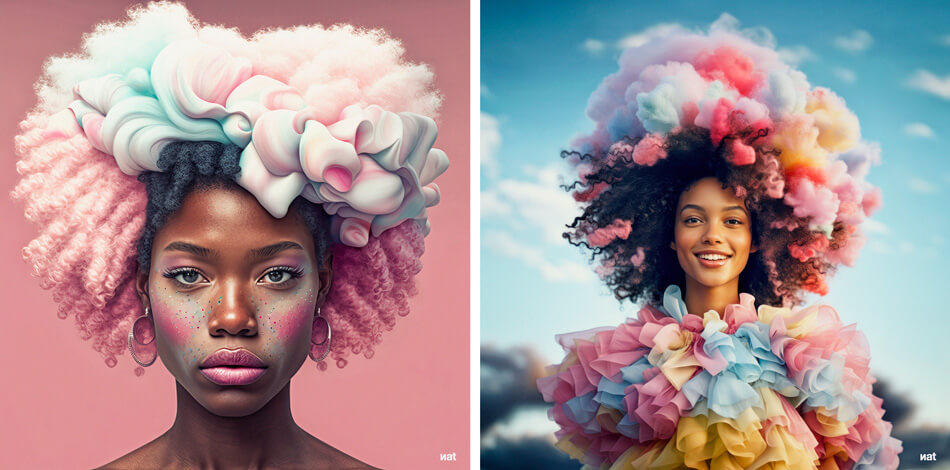
Two images created from Midjourney 8 months apart.
If the ability to create realistic – but not real – finishes through artificial intelligence has reached this point in less than 8 months and continues to evolve at the rate it is evolving, it is obvious that obtaining an answer to the question “What next? may be as complex as squaring the circle symbolically embodied in that parable of St. Augustine, the Trinity and the boy who, bucket by bucket, tried to empty all the water from the sea into a hole in the sand.
Another dilemma for the photographic industry
Any technological advance that directly touches the fibre of any productive sector is never free of controversy, nor is it free of consequences, both positive and negative. All of us who have dedicated ourselves to photography, and much more so those of us who trained in the analogue era of celluloid and chemicals, also had our moral dilemmas with the irruption of digital cameras and the democratisation of the use of digital retouching programmes such as Photoshop. And let’s not even talk about mobile phones and their increasingly sophisticated built-in cameras. There was no shortage of voices shouting “photography is dead”. But the fact is that it has not. More photographs are taken now than ever before and, despite the fact that a smartphone may be equipped with Leica or Carl Zeiss lenses, DSLR cameras continue to evolve and take over the market, to the point of saturating it with so much on offer. Photography is not dead, what has happened is that it has evolved, surpassing limits that 30 years ago we wouldn’t have imagined, which has forced the creatives, artists and professionals of this sector, not only to incorporate digital into their processes of image production, but to reinvent themselves and expand their capacities to offer something with which to stand out in the midst of this phenomenon that Joan Fontcuberta dissected in a very intelligent way in his essay of 2020, La furia de las imágenes: Notas sobre la postfotografía (The Fury of Images: Notes on Post-photography). And let’s be frank, because no one can deny that the technological evolution applied to the image has not only perfected the quality of the final finishes, but has also brought about a true creative revolution, with an astonishing diversity of styles, proposals and visual fusions. Nor has it meant the death of chemical photography, which has re-emerged in recent years as another identity option within all this audiovisual plurality that, despite its purist essence, is also disseminated through platforms such as Instagram, TikTok, or Facebook, all of them governed by algorithms that work with artificial intelligence.
Any technological advance that directly touches the fibre of any productive sector is never free of controversy, nor is it free of consequences, both positive and negative.
In my case, I have been creating images through photography, design and video for more than 30 years, 10 of which were exclusively analogue. That makes 20 years as a freelance professional and 16 with my own audiovisual communication studio. All this journey and everything I have learned to do along the way would not have been possible if I had closed myself off to the irruption of digital and every advance it has brought with it. It is not a question of embracing progress with open arms and offering it a blank cheque for everything. Doubting, questioning things, being critical…, is fundamental because it opens the doors to personal and professional research, and in the case of artificial intelligence, there are as many reasons to fear it as there are to enter into it and explore all its possibilities, not only in terms of generative AI, but also the whole range of tools that are emerging and that are already drastically reformulating digital image editing and post-production techniques. To some of these tools, which are not specifically aimed at the creation of graphic work through AI, we will dedicate the following lines of this post. Because not everything revolves around ChatGPT or Midjourney. AI, on a technical level, will also allow us to simplify editing processes and greatly improve the quality of our images and their final finishes, both for digital use and for printing, to such an extent that debates that for years have been part of the vicissitudes of the photography sector, such as what size sensor do I need to obtain images at very high resolution, will be settled here forever.
So let’s go…
Adobe Super Resolution
The developer par excellence of the most widely used image and video editing software on the market would have looked bad if it had not jumped on the artificial intelligence bandwagon with its own proposals and, it must be said, it has not done badly at all.
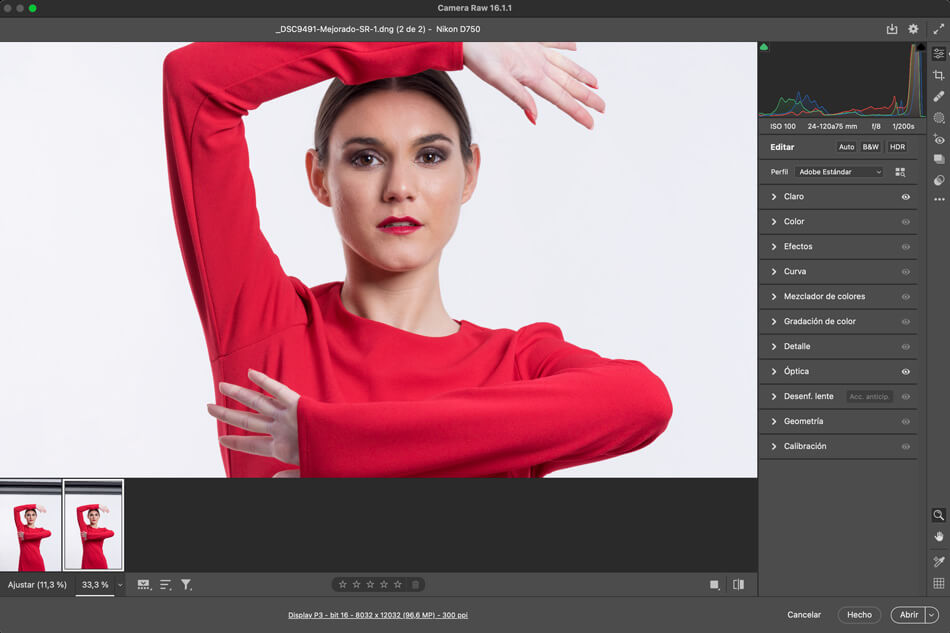
In early 2021, Adobe surprised its users with an update to Adobe Camera Raw that introduced a novel tool called Super Resolution. This feature blew many minds, including myself, and was a milestone in the ongoing debate about resolution and sensor size when considering the purchase of a camera. Suddenly, the resolution of a RAW file was no longer linked exclusively to the in-camera capture, but depended on the capability of software that could increase the resolution of the original image by up to four times. Although initially there were some flaws that required adjustment (nothing that couldn’t be fixed with other tools in Camera Raw and Photoshop), over time these aspects have improved considerably, calling into question the need for a full frame full of megapixels.
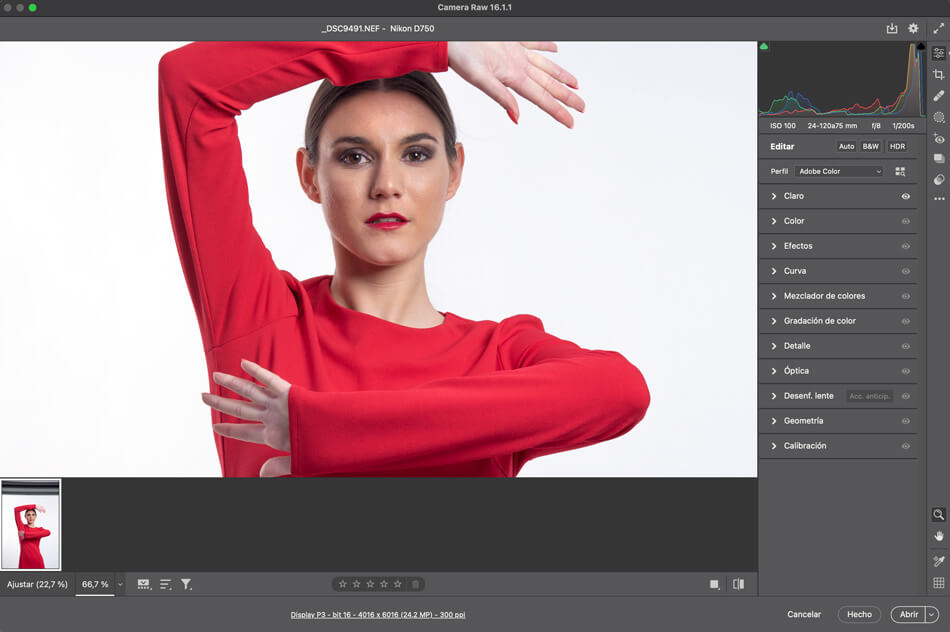
Raw RAW file opened in Adobe Camera Raw.
Super Resolution is based on an artificial intelligence called Enhance Details, developed just a couple of years before it was incorporated into Adobe Camera Raw. This AI has been trained on millions of images to understand interpolation patterns and algorithmically correct major pixelation and colour banding errors when interpolating an image. In other words, it fills in the missing information in the original image with “invented” data, thus achieving a file with much more information than the one obtained by the camera. Interpolation is not new to those of us who work digitally with images, but the results, especially when the difference between the size of the original file and the resulting file was considerable, often left a lot to be desired, despite the post-production. Suddenly, an AI came along to solve one of the main challenges for photographers and digital creatives, and it did so in an automated and fast way. As this AI continues to train itself, the results are getting closer and closer to the perfection of an original image captured with a very high resolution sensor.
If you’re thinking of buying the camera with the most powerful sensor on the market to wallpaper your house with billboard-sized photos, I recommend you check your workflow, because this is just the beginning…
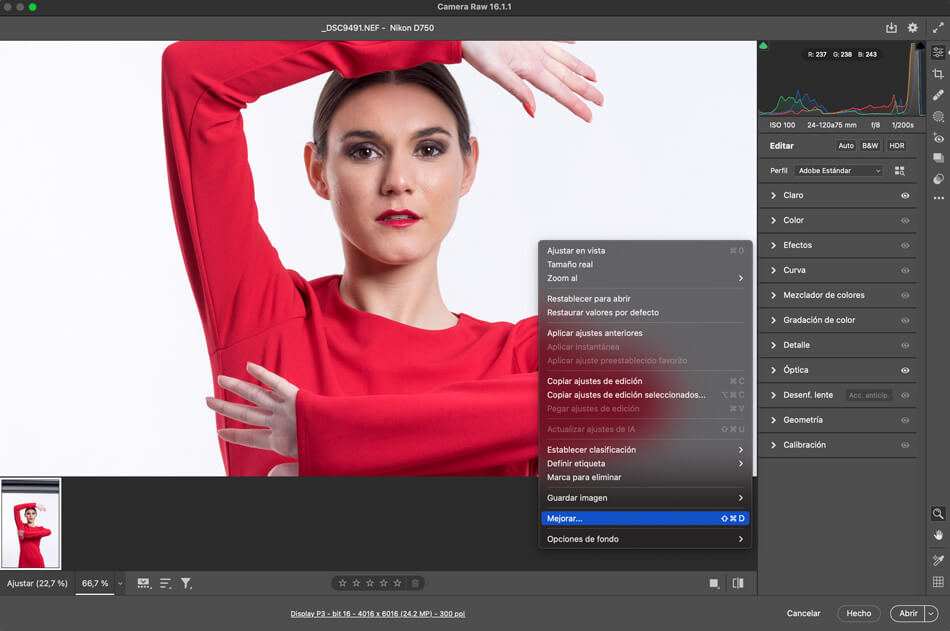
To activate Super Resolution once we have opened our RAW file in Adobe Camera Raw, we only have to click on our image with the right mouse button and open the options menu. Next, select the Enhance option and in the next box activate the Super Resolution field, and finally click on the Enhance button.
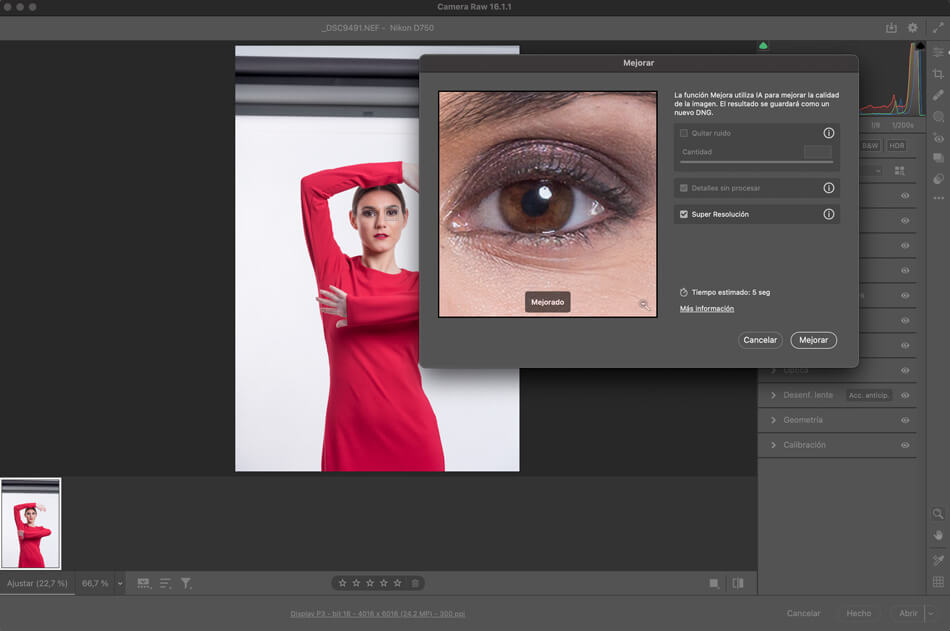
This will generate a DNG file that, depending on the power of our computer, will take more or less time. Once generated we can select the file we want to work with by clicking on the thumbnails of the image that appear at the bottom of the main Adobe Camera Raw screen, the first one being the original and the second one the enhanced one.
To give you an idea of what is achieved with Super Resolution, the original RAW file you can see in the screenshots corresponds to a photograph taken with my Nikon D750 Full Frame, with a 24.2 MP sensor and an output size of 4016×6016 mm at 300 dpi. After processing it with Super Resolution, the resulting DNG file is equivalent to a 96.6 MP file with an output size of 8032×12032 mm at 300 dpi. This process can be done either before or after adjusting the rest of the Adobe Camera Raw parameters, as the use of Super Resolution does not modify the existing settings at the moment of its execution.
So, if you’re thinking of buying a camera with the most powerful sensor on the market to wallpaper your house with billboard-sized photos, I recommend you check your workflow, because this has only just begun…
Generative Fill, also from Adobe
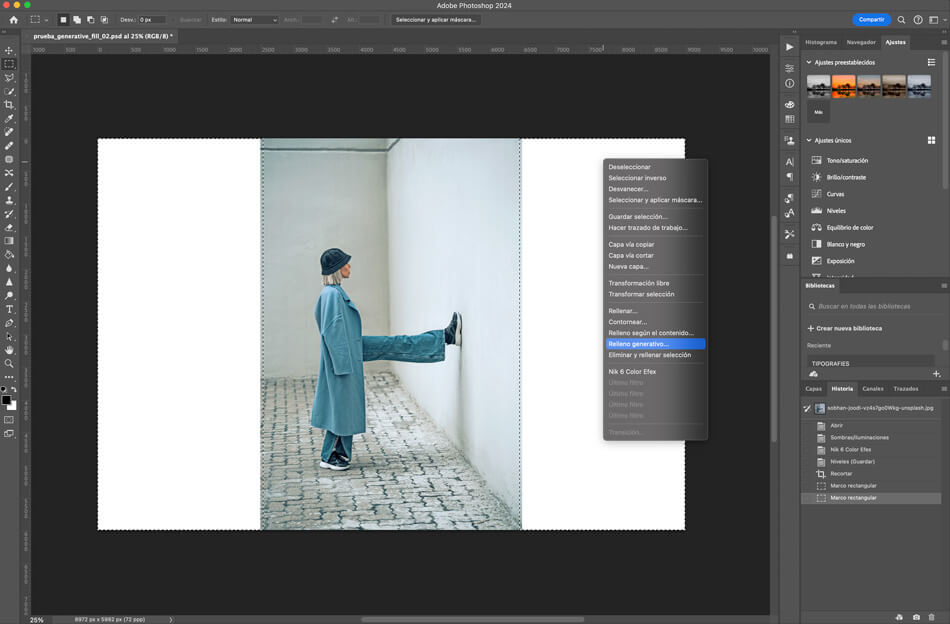
And now, if you are not familiar with this tool that was tested for a few months in a kind of beta version of Photoshop included in Adobe Creative Cloud and that, since the end of last year, has been included in the latest versions of Adobe Photoshop, your head will explode. This is the Generative Fill tool that can be used in two variants: Generative Fill and Generative Enlargement. So, let’s assume that we have a photographic image in vertical format and we need to obtain from it another one in horizontal format. Until now, the only thing we could do was to apply the format by cropping only the content of the original image, unless we were gifted digital retouchers capable of perfectly filling in the content of the empty areas resulting from enlarging the frame without cropping.
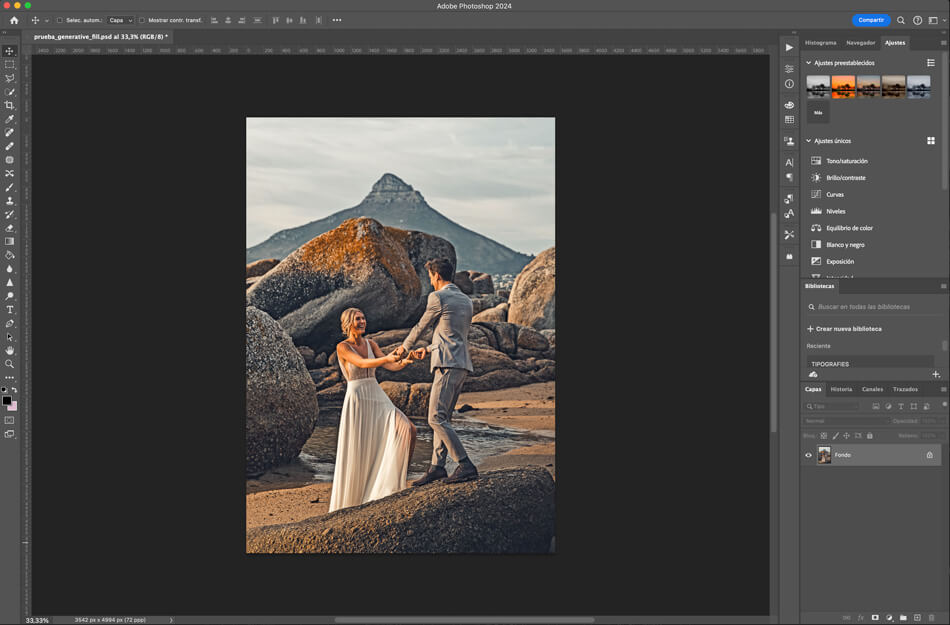
Well then. Now, once we have opened the vertical image in Photoshop, we are going to start using the Generative Enlargement, for which we will activate the Crop tool in the toolbar. After activating it, we will see its options in the top bar of the main window and, when we open the Fill field, we will find the Generative Enlargement function, which is the one we must select.
After this, we will also set the ratio for the new crop format, e.g. 3:2 (horizontal) and then apply the magnification we want to obtain on the image and press enter.
And this is where the magic begins. A small window will appear on the screen with a seemingly simple question: What do you want to generate?

Active Generative Enlargement Tool.
Generative Fill’s AI will analyse the original image in seconds and “invent” the remaining content with such consistency that more than one person’s eyes will pop out of their sockets.
It is in this field where we must enter the prompt, that is, the instructions that we must give the AI to generate new content and thus fill in the empty areas of the new frame. But the thing is that the tool is so ‘intelligent’ that we can do without entering any instructions at all, which is why the text Optional appears next to the question and we simply press the Generate button. The Generative Fill AI will analyse the original image in a few seconds and “invent” the remaining content with such consistency that more than one person’s eyes will pop out of their sockets. It happened to me the first time, I had to pick them up from above the keyboard and put them back in their sockets.
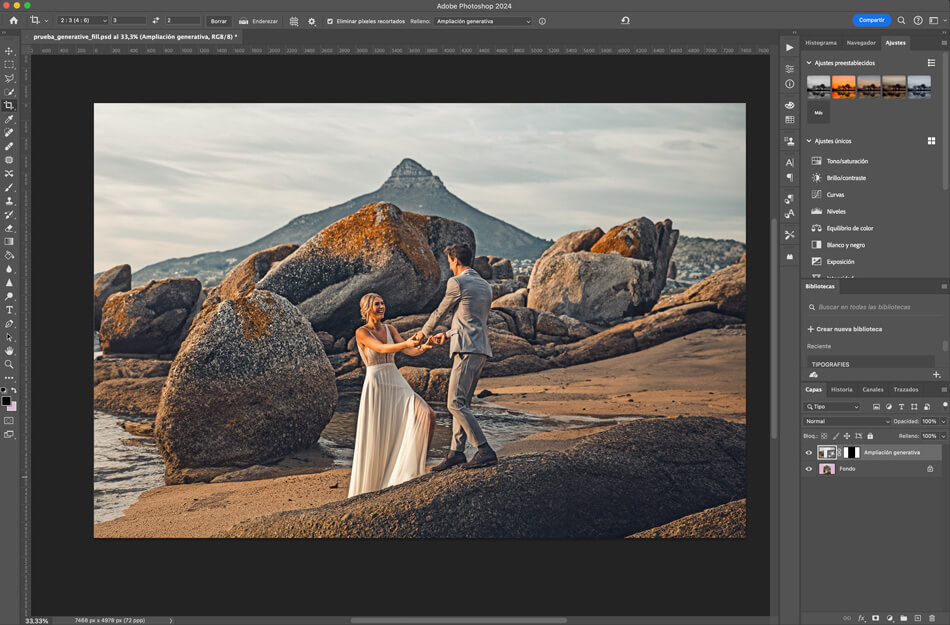
Result of the application of the Generative Enlargement tool on the original vertical image.
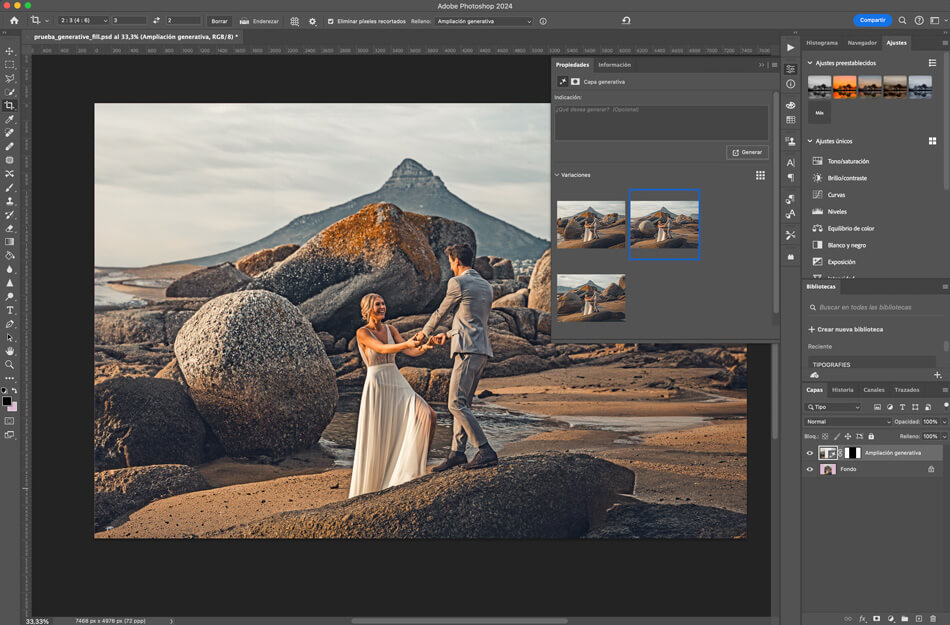
But be careful, it doesn’t stop there. As the AI is cooler than an eight, it will not only generate a single content, but it will also suggest at least 3 proposals, which it will show you in another window, in the form of thumbnails that you can click on to see each variant in the main image. And if none of the proposals convince you, from that same window you can generate new variants to infinity and beyond. With each click, the AI will generate 3 more proposals, so you run the risk of entering a loop and the next day you’ll find yourself petrified in front of the computer with your index finger as if you were sending a telegram the old-fashioned way.
And don’t forget that you have the option to indicate through a prompt, in a more specific way, what you want it to generate, so, if full automation doesn’t convince you, you can always try to enter more precise instructions, which I recommend you to be as specific as possible (this is not Midjourney or ChatGPT) and, of course, in English, so if your level is not very fluent, don’t worry, because at the end of this article I will tell you some little things you can do to solve this problem…And also with the AI, of course, because that’s what this whole thing is about.
But Generative Fill also allows you to enlarge images with non-existent content and even introduce new elements such as objects, wardrobe changes and even remove annoying things like that finger you stuck in front of the camera when shooting a photo. And for that we have the option to work the image with the Generative Fill method.
In this case we can obtain similar results to those of Generative Enlargement, if what we want is to enlarge the content of the original image, so we can start again with the Crop tool but, in this case, in the Filling field we will simply select the Background option (default) so that, when enlarging the format according to the chosen proportion (let’s try again with 3:2), what you will obtain are empty areas around the original with only the uniform colour you have selected as background colour.
To use the Generative Fill, activate the selection tool and select the empty parts of the new frame, always including a small part of the original content so that the AI can have a starting point with which to generate the new content. In this case we can select all the parts in a single selection or work each area with independent selections and, therefore, obtain several generations of content in the same image.
With the selection active, we click on it with the right mouse button and, in the drop-down menu, we will see the three options we are interested in: Content-Aware Fill, Generative Fill and Remove and Fill Selection.
In the case of Generative Fill, the steps to follow are exactly the same as with Generative Enhancement, so, again, we will start from the little window with the question “What do you want to generate?
With the Remove and fill selection option the process is fully automated, without the option of entering any prompts and, from my own tests, it is almost preferable to use this option to obtain a fill from a uniform original content, such as enlarging the neutral background of a studio portrait.
Finally, we can opt for Content-Aware Fill, which will activate a kind of brush tool with which we can get samples around the original image for the AI to generate content based on them within the selection area.

Result of the application of the Generative Fill tool on the original vertical image.
But undoubtedly, one of the most interesting utilities of Generative Fill is, as I mentioned before, the possibility of creating or deleting content within the original image itself, for which we must work through the prompt window and enter the instructions (in English) of what we want the artificial intelligence to do. So, by way of demonstration, the best way to see the possibilities is through comparison, and the three tests you can see below serve as an example, in which we have worked by selecting only the area of the original image in which we want to intervene. In the first we have asked the AI to remove some letters on a piece of clothing, in the second to remove a cactus and fill the area with the content of the background and, in the third, to add nothing more and nothing less than a pair of sunglasses on the image of a model.

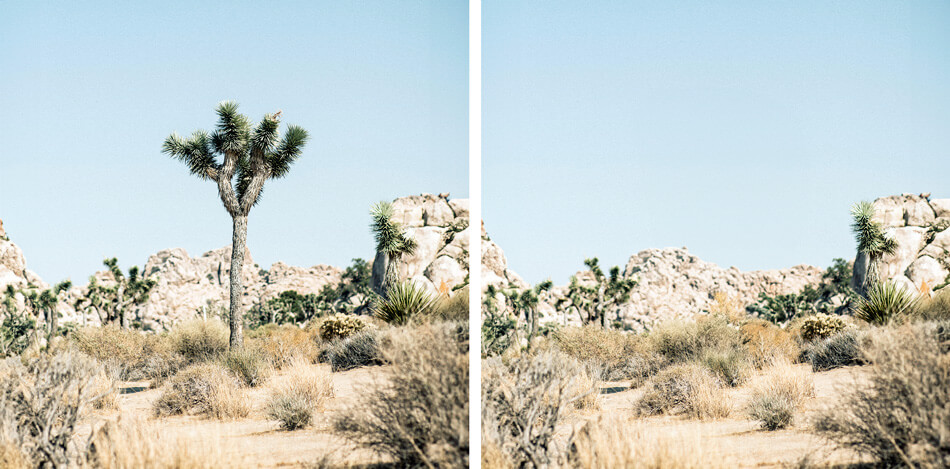
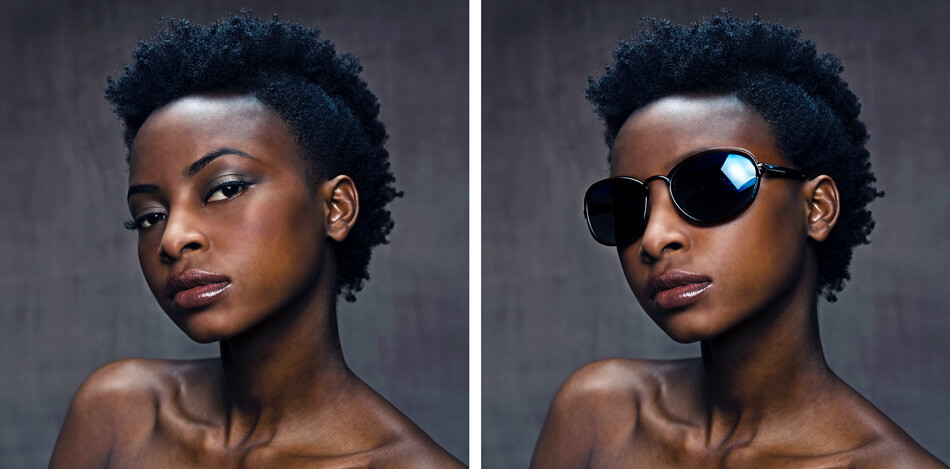
But undoubtedly, one of the most interesting utilities of Generative Fill is, as I mentioned before, the possibility of creating or deleting content within the original image itself, for which we must work through the prompt window and enter the instructions (in English) of what we want the artificial intelligence to do. So, by way of demonstration, the best way to see the possibilities is through comparison, and the three tests you can see below serve as an example, in which we have worked by selecting only the area of the original image in which we want to intervene. In the first we have asked the AI to remove some letters on a piece of clothing, in the second to remove a cactus and fill the area with the content of the background and, in the third, to add nothing more and nothing less than a pair of sunglasses on the image of a model.
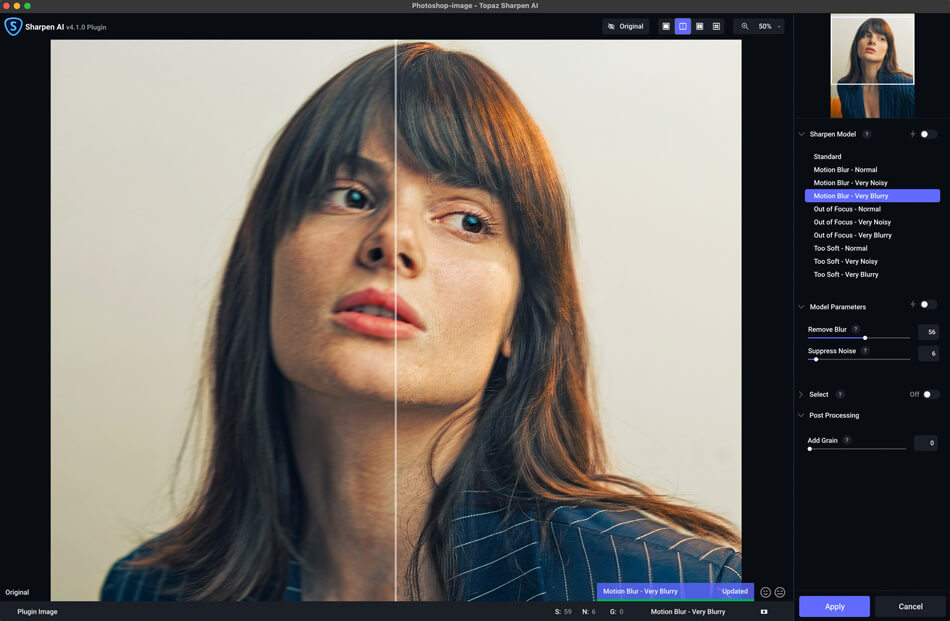
Topaz Sharpen AI interface.
Working with Topaz Labs software is relatively simple. It is a matter of understanding the operation of a few parameters that will allow us to operate manually or let the AI act in automatic mode according to the options of each application.
There is currently a version of Topaz Labs that integrates the operation of the three applications that we are going to see below, although in a more simplified way. This is Topaz Photo AI. But I think the best way to understand how this AI works is to see it on each type of application separately and then, each person can decide whether they are interested in one option or another because, at the end of the day, the concepts on which they are based are the same, both in the individual versions and in the integrated version.
Topaz Sharpen AI
In the case of Topaz Sharpen AI, there are 4 main image processing models available. The Standard model, which applies general processing to the image, Motion Blur, with which we can work on images affected by motion blur, Out of Focus for images that are directly out of focus and Too Soft for those that, without having a very pronounced blur, are affected by a certain lack of sharpness. All these models have 3 more options, Normal, Very Noisy and Very Blurry, with which we can fine-tune the processing depending on whether the problem of lack of sharpness comes from an excess of noise in the image or if it is directly blurred. But, best of all, if we are not sure which option is the best to solve the sharpness problem of each image, we can automate the process and let the AI do a preliminary analysis and choose the ideal processing model for each image. To do this, we must activate the automatic option (indicated by a lightning bolt icon) in the Sharpen Model menu selector.
In addition, we also have the option to operate with each processing model, either automatically or in manual mode, fine-tuning the image focus (Remove Blur) and noise (Suppress Noise) ourselves, or letting the AI do it automatically.
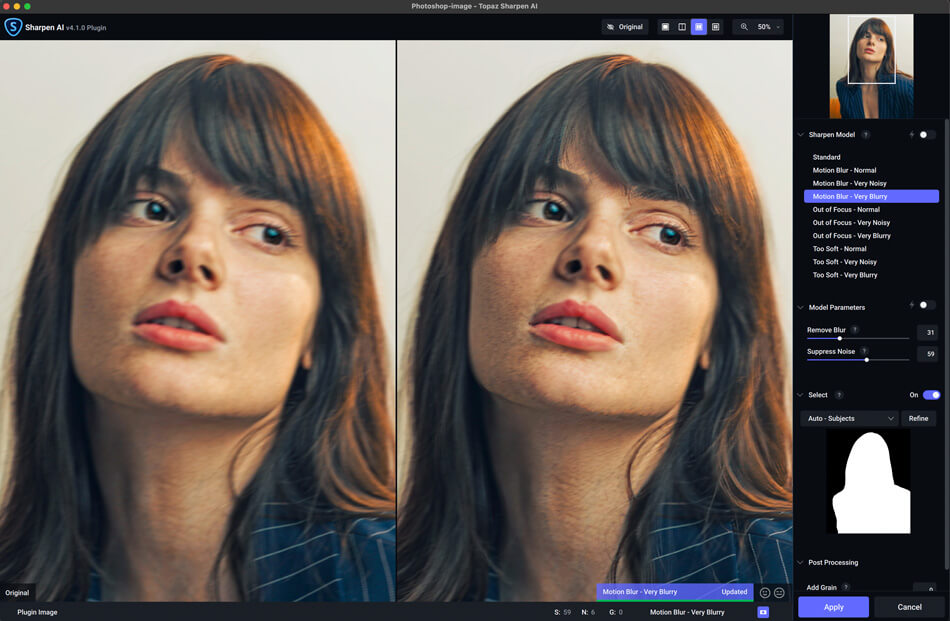
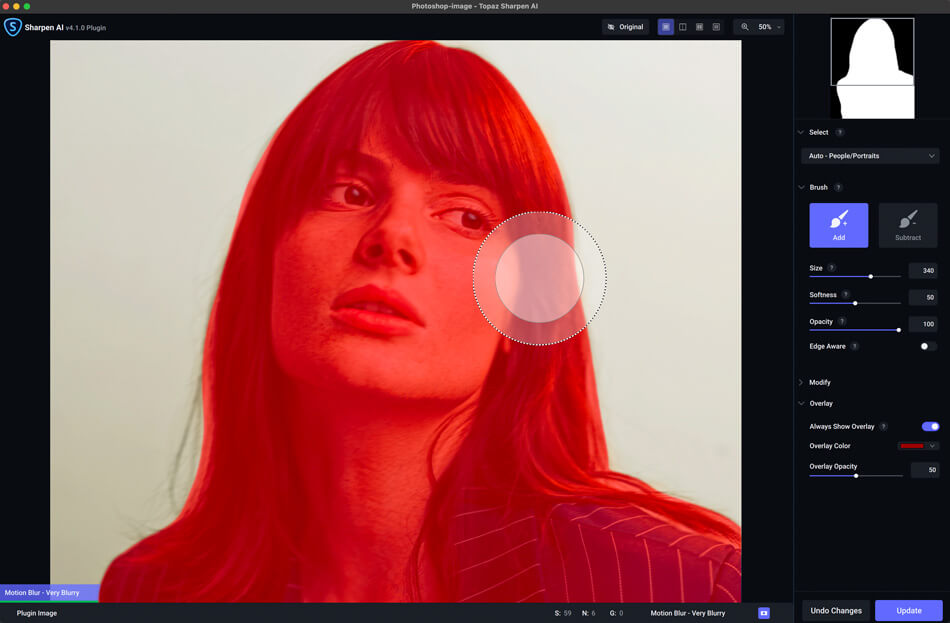
Another very interesting aspect of Topaz Sharpen AI is the mask mode processing function, which can be very useful in photographs in which we want to correct aspects such as depth of field or gain sharpness in specific areas of the image. With the Select option activated, we can choose various types of automated masks or expand or reduce them (Refine) using a brush tool (Brush) that also has its own configuration and saving parameters.
If the Adobe Super Resolution tool is not enough for you, all Topaz Labs programmes are prepared to work directly on a RAW file, so you can get an idea of the resolution and visual quality that you can achieve, combining different tools, in the digital development process prior to image editing or postproduction.
And to be able to see all these effects with total clarity before applying each processing, the Topaz Sharpen AI interface allows us to visualise them in several modes and with a zoom of up to 400%, combining the original image with the processing preview in split or scrollable windows or by showing several of the models at the same time so that we can compare different results on the same image. Both Topaz Sharpen AI and Topaz Noise AI, which we are going to talk about next, can be integrated as Photoshop plugins, which allows us to operate on any file that we have open in the Adobe program and, in addition, if you do not have enough with the Adobe Super Resolution tool, all the Topaz Labs programs are prepared to work directly on a RAW file, so you can get an idea of the resolution and visual quality that you can get, combining different tools, in the process of digital development prior to the editing or postproduction of the image.
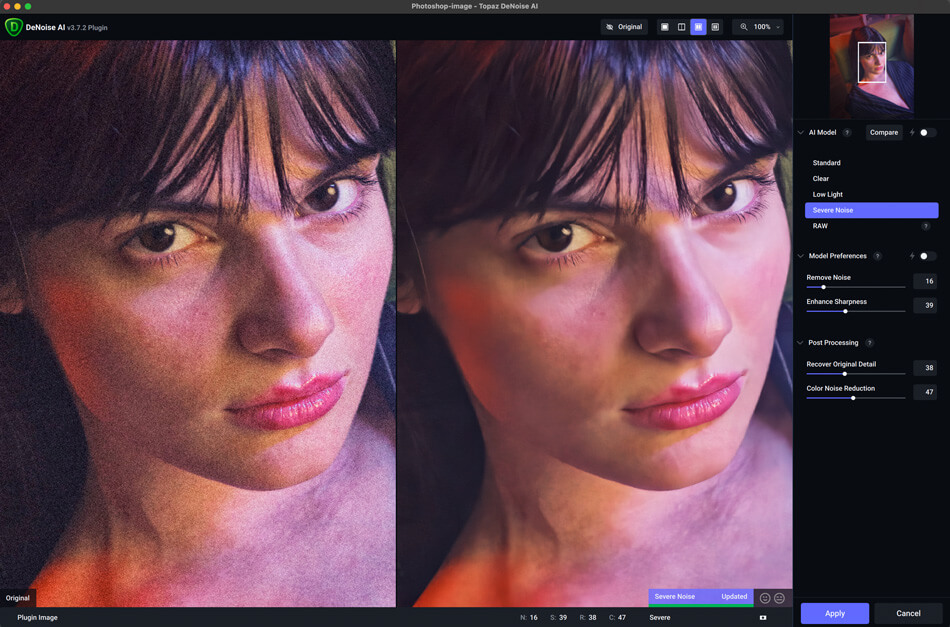
Topaz Noise AI
The interface of Topaz Noise AI is almost identical to that of Topaz Sharpen AI but, in this case, as its name suggests, the programme is aimed at solving digital noise or “grain” problems, another of the headaches that many photographers have encountered, especially when working at high sensitivities in low light conditions, with those annoying combinations of sharp highlights and noisy shadows.
Again we have the same preview and comparison windows between originals and processed images available in Topaz Sharpen AI and, in this case, five models to process our image: Standard, which comprehensively reduces noise while preserving details; Clear, which works very well on smooth surfaces such as skin; Low Light, for images taken in low light situations; Severe Noise, for excessive noise conditions and, finally, the RAW mode, ready to work better from raw RAW files.
Topaz Noise AI interface.
Each model has its own tools for manual fine-tuning of the Remove Noise and Enhance Sharpness processing.
Needless to say, both when choosing the processing model that best fits the original image and when making use of the tools of each model, the AI can also work in an automated way, analysing the conditions of each image and choosing the most suitable model, as well as the ideal setting for each type of processing.
And if this is not enough, Topaz Noise AI allows you to make a final adjustment (Post Processing) after the AI processing, with which we can gain a little more definition or solve colour artifacts problems.
Topaz Gigapixel AI
And now let’s go to a tool that, in my case, has become essential, especially for images created from generative AI, such as Midjourney which, nowadays, only allows us to obtain them at low resolution, such as 1024×1024 pixels in 1:1 format, which is the one I use most often.
Topaz Gigapixel AI allows us to scale any image file to the output size we want, regardless of its compression and resolution, obtaining a spectacular quality of detail that would perfectly pass the quality control of a file intended for large format printing. However, be careful, because the AI is not a miracle worker and the final result depends on other factors, not just the size of the original.
I give you my own working system as an example.
As I have already mentioned, when I generate images with Midjourney in square format, they are no larger than 1024 px on each side and, therefore, if from that size I want to obtain, for example, a 50×50 cm print file (5906 px at 300 dpi), we are talking about a considerable difference between the original and the image size at which I want to work in order to achieve a good visual quality with all the detail and sharpness.
So before I edit any low-resolution file in Photoshop, what I do is run it through Topaz Gigapixel AI first and scale it to the output size I want for each image, letting the AI apply what we might call a beastly interpolation to it.
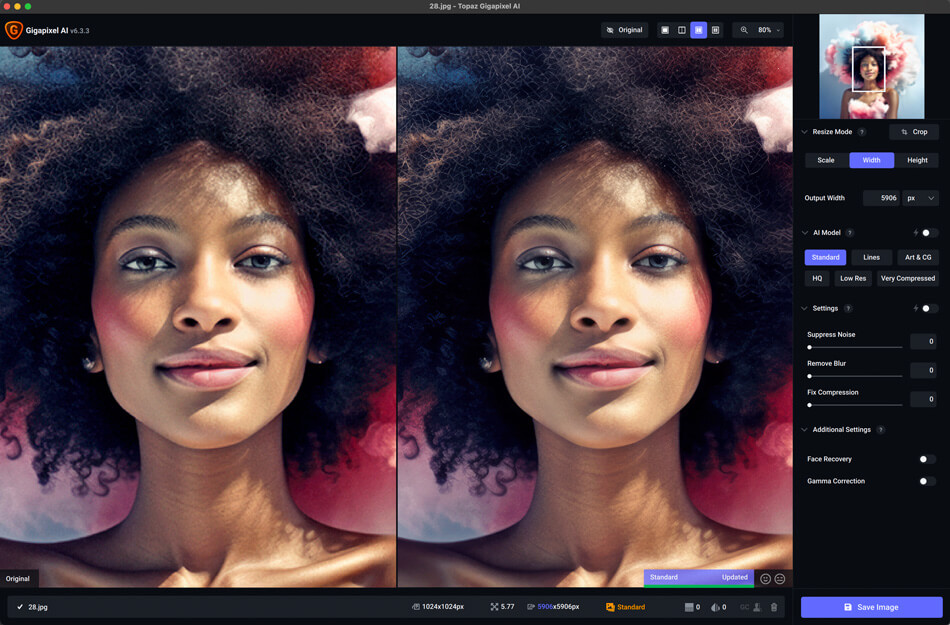
Topaz Gigapixel AI interface. On the left, the original image at 1024 px. On the right, the processed image at 5906 px.
Topaz Gigapixel AI allows us to scale any image file to the output size we want, regardless of compression and resolution, obtaining a spectacular quality of detail that would perfectly pass the quality control of a file destined for large format printing.
Again we find the same type of interface as Topaz Sharpen AI and Topaz Noise AI, with their characteristic preview windows and processing models. But first, in the Resize Mode field, we must indicate the scale or the output size, prioritising the image width (Width) or height (Height) and indicating the value of this in the Output field… in pixels, inches or centimetres.
With this information already entered, we can choose and adjust any of the 5 processing models offered by the programme, or let the AI do it for us automatically according to its own analysis of the original image.
Here again, we have a Standard model that works in a general way with all types of images. The Lines mode applies better precision to architectural or cityscape photographs where we are interested in highlighting the definition of lines, lines of flight, etc. Art & CG is the ideal option for graphic images, drawings or scans. With HQ we can enhance images already obtained originally at high resolution or work with those that have already been previously processed, for example, by applying digital filters, denoising, interpolation, etc. With Low Res we can scale images taken from the web or screenshots, which usually do not exceed 72 px dpi. And finally, the Very Compressed model is a good option for images with a lot of compression artefacts or for enhancing scans from a chemical support such as a negative, a slide or a print on photographic paper.
Each model has its own settings which, again, can be automated or manual. With these settings you can reduce image noise and minimise lens and motion blur. In addition, the Standard and HQ models have an additional setting, Fix Compression, with which we can improve the image by also reducing compression artefacts.
Topaz Video AI
I wanted to include in this article an artificial intelligence programme dedicated to video, on the one hand, because I know that many photographers also work in this discipline and, on the other, because if with the previous programmes it has become clear that AI is bringing about a huge change with respect to the technical needs when it comes to acquiring a camera, you have no idea what is coming now in the field of video, you have no idea of what is coming in the field of video and, for now, we are only going to focus on the use of AI as a technical editing tool, because if we open the melon of what is already being considered in terms of generative AI applied to video, cinema, etc., more than one person will jump out of the window head first.
The latest gadget from the guys at Topaz Labs is Topaz Video AI and, once again, we are before a software that will make us rethink things, and a lot, when deciding what equipment to buy to record video because, if in the case of AI applied to photography, issues such as the power of the camera sensor are no longer so decisive to obtain images at very high resolution, in terms of video, it will matter little from now on the recording resolution or frame rate.
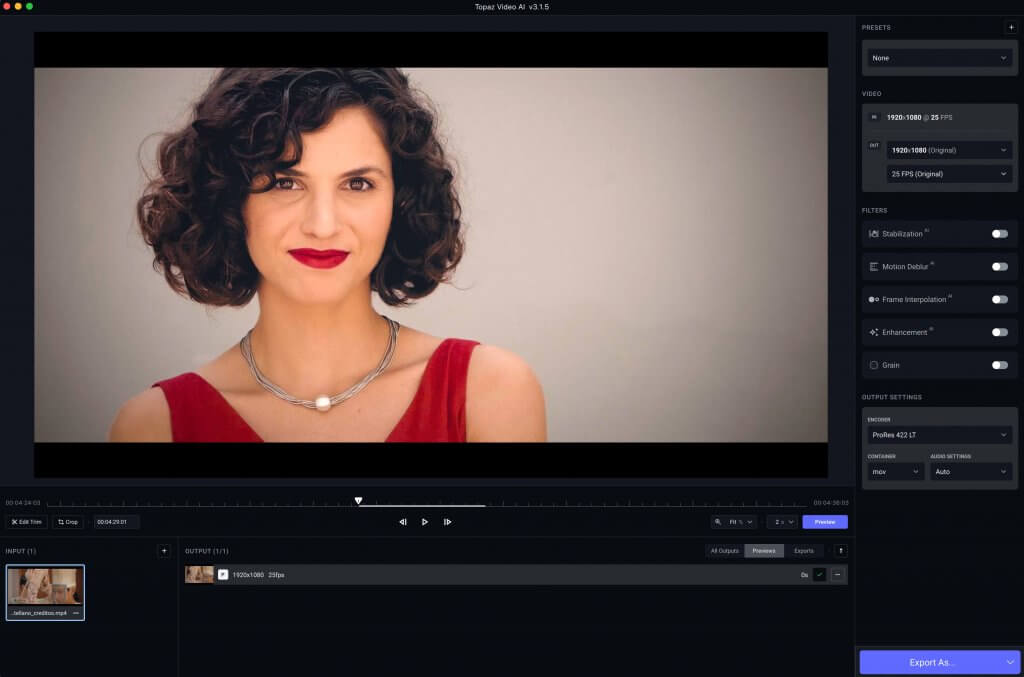
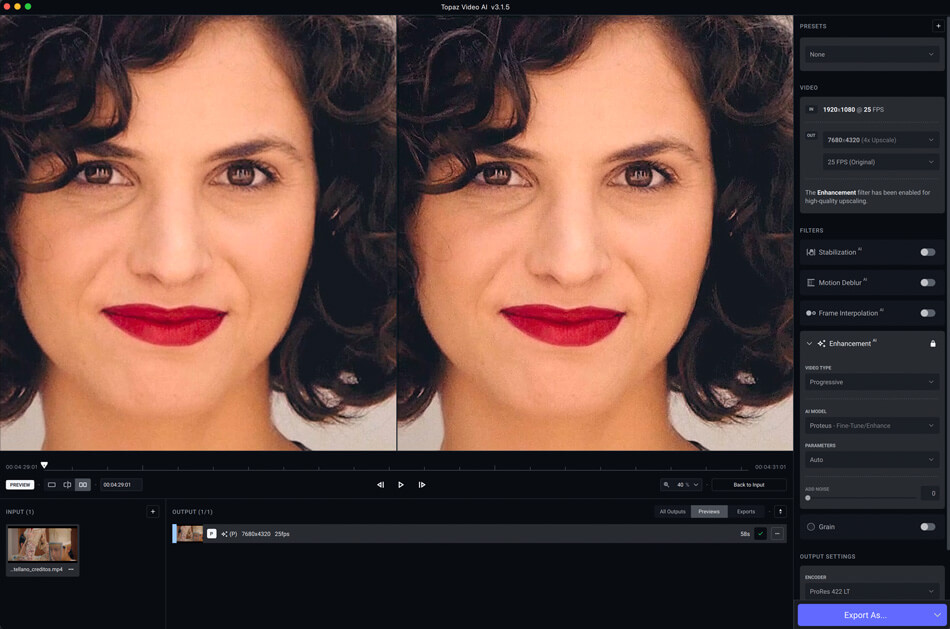
Topaz Video AI interface.
Topaz Labs’ latest piece of software is Topaz Video AI and, once again, it’s a software that will make you rethink your decision on what equipment to buy for video recording.
Let’s say, for example, you record a video file, either with a video camera, a DSLR or a smartphone, at Full HD resolution (1920×1080 px) and at 30 fps. Well, with Topaz Video AI you can scale that video file to a resolution of up to 8K with the same quality as if you had originally obtained it in camera at the same resolution and, in addition, (get ready to catch your eyes again on the fly) convert the original frame rate to any other between 24 and 120 fps, or change the type of encoding (codec) in the output settings of the final file, whatever the one used in the recording, with the quality of a native codec.
Again I draw on my own experience. A few years ago I bought a camera, the Panasonic Lumix DMC FZ2000, a bridge model that at the time had a certain impact because of how well equipped it was for video recording, even at a semi-professional level. It could capture up to 4K at 30 fps on a 1-inch sensor, and was notable for its connectivity to essential accessories such as microphones, external displays and so on. It also had a powerful Leica lens with a 24-480mm zoom and a host of other features of a professional camera without being a professional. At the time it was one of the best investments I made in equipment for my studio and now, thanks to the AI options, it has been fully consolidated despite the number of superior cameras, in all aspects, that have emerged since then.
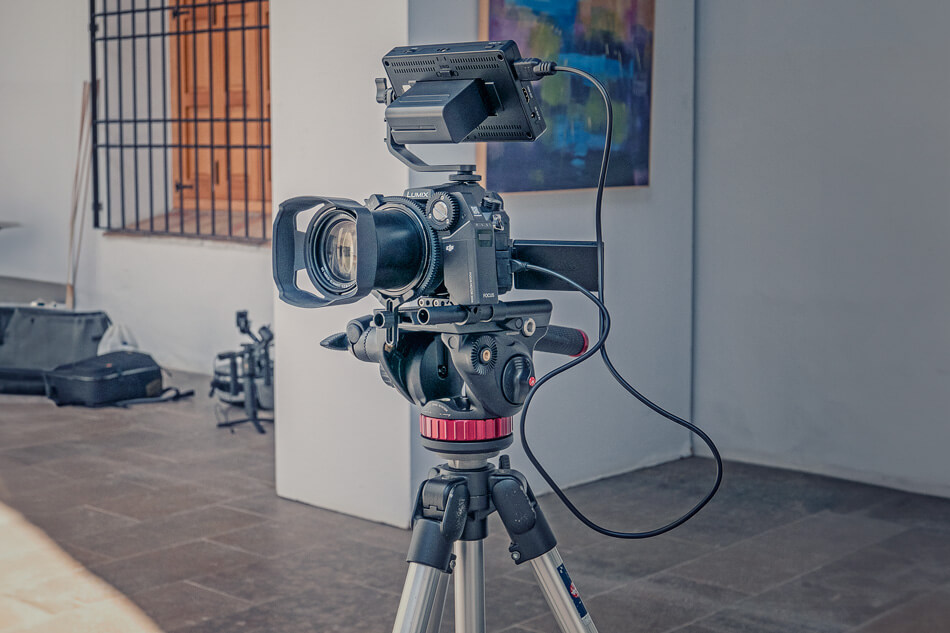
My video equipment with the Panasonic Lumix DMC FZ2000.
The FZ2000 had its obvious limitations for a camera in the €1,300 price range at the time. On the one hand, despite being able to record in 4K at 30 fps, this quickly became obsolete with the appearance of cameras that could record in UHD, with higher frame rates, and without applying any crop factor on the sensor, as is the case of this camera, or the limitation of recording codecs and bitrate that prevented a higher image quality. Although video is not the discipline I work most in my studio, I was tempted to sell this equipment and invest in a superior camera that would allow me to record in 4K with a higher frame rate, essential to obtain a clean and smooth slow motion effect and to be able to take full advantage of a wide angle lens at that resolution, issues that with the FZ2000 were only viable in Full HD recordings at the most.
Well, in the middle of this dilemma, Topaz Video AI appears, proposing a series of solutions for video impossible to believe until now and after several tests reconverting some of my projects into video I have come to the conclusion that I have the ideal equipment to carry out any video project without the need to change camera in a long time and making up for its limitations thanks to artificial intelligence, obtaining final video with a quality close to broadcast.
When we open Topaz Video AI we find, once again, a simple interface, a trademark of the house, with a main window where we can view our video after loading it from our computer and preview the conversion we apply, comparing it with the original in split screen. We also have the option of trimming the video (Trim) or modifying the final framing as we wish (Crop).
But what we should look at first of all is the side column and the amount of options that the programme offers us, being able to opt for ready-made presets that can be extended with other parameters, or compose a battery of options to our liking according to the result we are looking for with the conversion.
In the Video section, we see the resolution and frame rate of the original file and, from there, in the drop-down menus of the Out field we can select the output resolution and the new frame rate we want to apply in the conversion, scaling the image to the standard formats (SD, HD, FullHD, 4K, 8K…) or creating our own custom scaling.
But Topaz Video AI also has filters to improve the image with its own stabilisation system using artificial intelligence (Stabilization) that includes aspects already known by any videographer such as Auto-Crop and other functions, or the very interesting Motion Deblur that reduces the blur effect in moving shots, increasing sharpness and detail without that annoying contrast at the edges typical of an interpolation made in a rudimentary way. And if what we want is to achieve a good slow motion effect, with the Frame Interpolation function and its different options, the AI will do its thing with spectacular results. Finally, in the filters section, we have the Enhancement function with its respective input options for video files originally created in progressive (p) or interlaced (i) mode and which, in my case, has been fundamental for improving the quality of videos digitised from analogue video formats such as VHS and eliminating the annoying scan lines characteristic of this type of analogue to digital conversion process.
And let’s not forget another fundamental tool of Topaz Video AI: the Output Settings, which include several standard codecs such as H264 or H265, but also some high-performance ones such as Apple’s ProRes, with which you can obtain a better video quality and bit rate with respect to the original.
However, unlike the Topaz Labs programmes for still images, which usually work quite fast even if you don’t have a very powerful computer, in the case of Topaz Video AI, and as is logical with any digital video editing programme, it is advisable to pay close attention to the technical requirements of the programme because I assure you that some of the processes, especially when working with relatively long videos, are going to need a good machine, both in terms of processor, RAM, and RAM, it is advisable to take a close look at the technical requirements of the programme because I assure you that some of the processes, especially when working with relatively long videos, will require a good machine, both in terms of processor, RAM and graphics, in order to be able to run the preview without problems and then process the final file.
And finally, The End
And so we come to the end of such a long article, and I have left a lot of options behind that we will see in future posts dedicated to artificial intelligence. In fact, at some point we will have to talk about Adobe Firefly, Adobe’s foray into generative AI in the style of Midjourney or Dall-E, but with its own interface, which I am still investigating, and we will also have to spend time analysing the operation of interesting tools such as Evoto (among others) with which we can achieve spectacular results in the treatment of the skins of photographic portraits, replacing with AI editing processes as laborious as retouching by separation of frequencies or Dodge and Burn, with identical results.

Adobe Firefly, Adobe’s “Midjourney” with a few more things.
AI is inevitable, as have been many other developments throughout history. The best way to adapt to change is personal research and, at the very least, knowledge, even of what contradicts us.
I am aware that the irruption of artificial intelligence brings with it an internal debate and, as I mentioned at the beginning of this article, it is not a question of accepting everything that is proposed to us or of leaving aside other methodologies that make us enjoy the processes independently of the final result. Each professional, creative or artist has the last word when it comes to integrating, or not, AI in their production processes and in their way of understanding what they do. That is why I wanted to focus in this article on practical tools and not so much on generative AI that simulates images as if they were photographs, illustrations and all kinds of graphic works and, as I always do when Arcadina invites me to write an article on her blog, I always approach things from my own experience because, for me, the only way to reach conclusions every time a technological advance shakes the foundations of the sectors in which I work, is based on the “test and result” method.
The future is inevitable, however reluctant we may be. AI is inevitable, as have been many other advances throughout history. The best way to adapt to change is personal research and, at the very least, knowledge, even of what contradicts us. Then, everyone will find a way to fit these advances into their own work system, taking them to their own territory, because AI will open wounds on many fronts, but it will also heal many others and, even if it already has the capacity to learn by itself, the use we make of it still depends on ourselves.
Bonus Track
And as a promise is a promise, here’s a tip for those of you who don’t have enough knowledge to create prompts in English fluently. I recommend that you try writing your texts and then use ChatGPT to translate them. What’s more, ChatGPT can develop specific and very well detailed prompts from a briefing of what you want to achieve and its language translation capacity already surpasses that of any online translator such as Deepl or Google Translator, especially if you use ChatGPT 4.0, the most advanced version, although it should be noted that this is already paid.
And, as I said, the only way to learn to control the AI is “trial and error” and so on until you get what you clearly feel is your own….
As you can see, AI is now part of every photographer’s workflow. To make the most of it you need a platform that keeps up: with Arcadina you can take advantage of our integrations with AI, Lightroom and more tools and showcase your work on a professional photography website. Want to try it? Create your website for free and check the pricing.
Will it continue…?