How to set up your Christmas campaign in Booking, step by step
The Christmas photography season can be one of the most profitable times of the year—and one of the most time-consuming on WhatsApp. Messages like “Do you have any openings on Saturday?”, “How much is the mini session?” and “How do I pay the deposit?” multiply in November and December.
With a campaign in Booking, your clients can view your packages, choose an available date and time, and pay the deposit without you having to step in. You simply receive the confirmed booking in your calendar.
In this guide, you’ll set up the entire campaign step by step:
- Create your session types: Mini, Basic, and Full.
- Group them into a Christmas campaign with its own booking window.
- Set the calendar and hours for the days you plan to work.
- Collect a deposit when clients book.
- Give existing clients early access and share your campaign.
- Automate confirmations, reminders, and the gallery that follows.
It will take an afternoon. In return, you’ll save hours of messaging throughout the season.

Before you start: 3 things to have ready
Spend 10 minutes on these before creating anything. If you leave them until later, you’ll have to go back through each session type.
1. Booking enabled on your website. If you haven’t activated it yet, follow the first steps for activating Booking.
2. Payment methods enabled for Booking. Configure them in Control panel / Sales / Payment methods. For bookings, you can offer:
- Card payments (Stripe or Redsys);
- PayPal;
- Bank transfer;
- Cash at the studio.
Open each payment method and enable it for Booking. Otherwise, it won’t appear in the booking checkout.
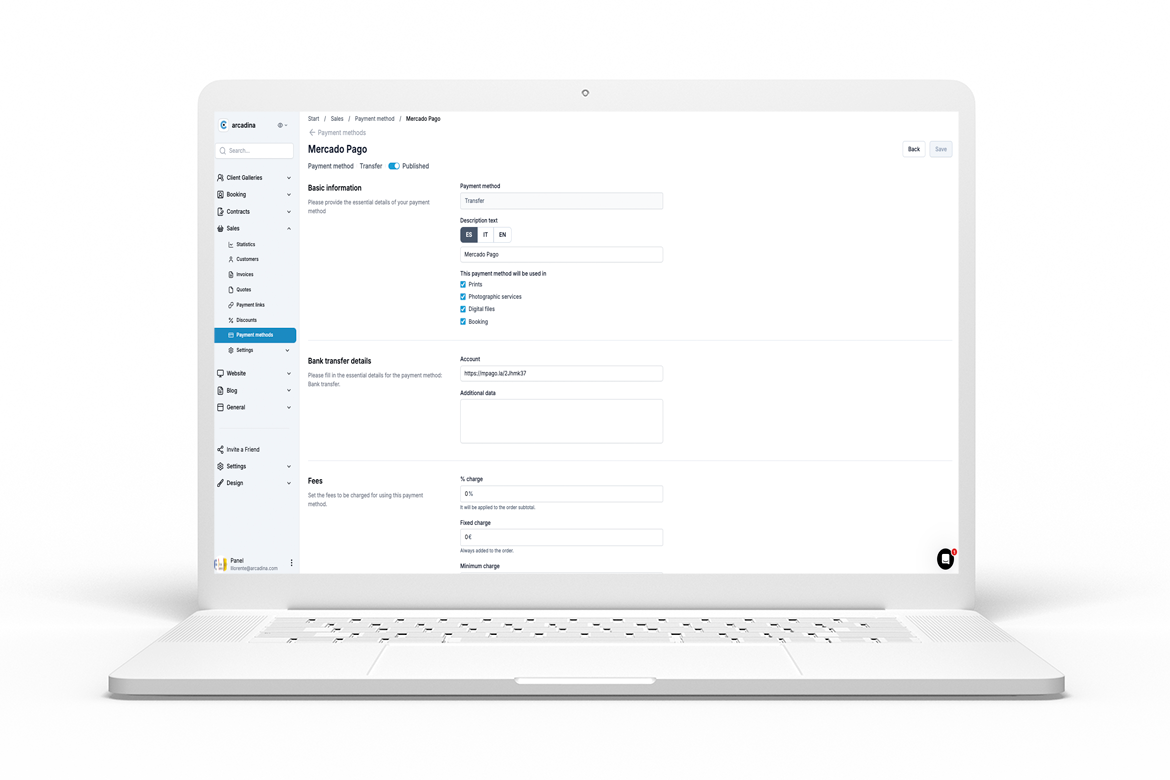
3. Booking’s general settings reviewed. You’ll find them under Booking / Settings. They apply to all sessions by default:
- Schedule: your usual studio hours. You’ll customize them for the campaign later.
- Sessions: duration, start-time intervals, breaks between sessions, the payment deadline for offline payments (1–30 days), and the minimum advance notice for bookings.
- Texts: automatic messages for new bookings, reminders, and changes.
Everything is explained in Booking. Settings.
Tip: decide on your packages and prices now. This will make the rest of the setup much easier.
Step 1. Create your session types: Mini, Basic, and Full
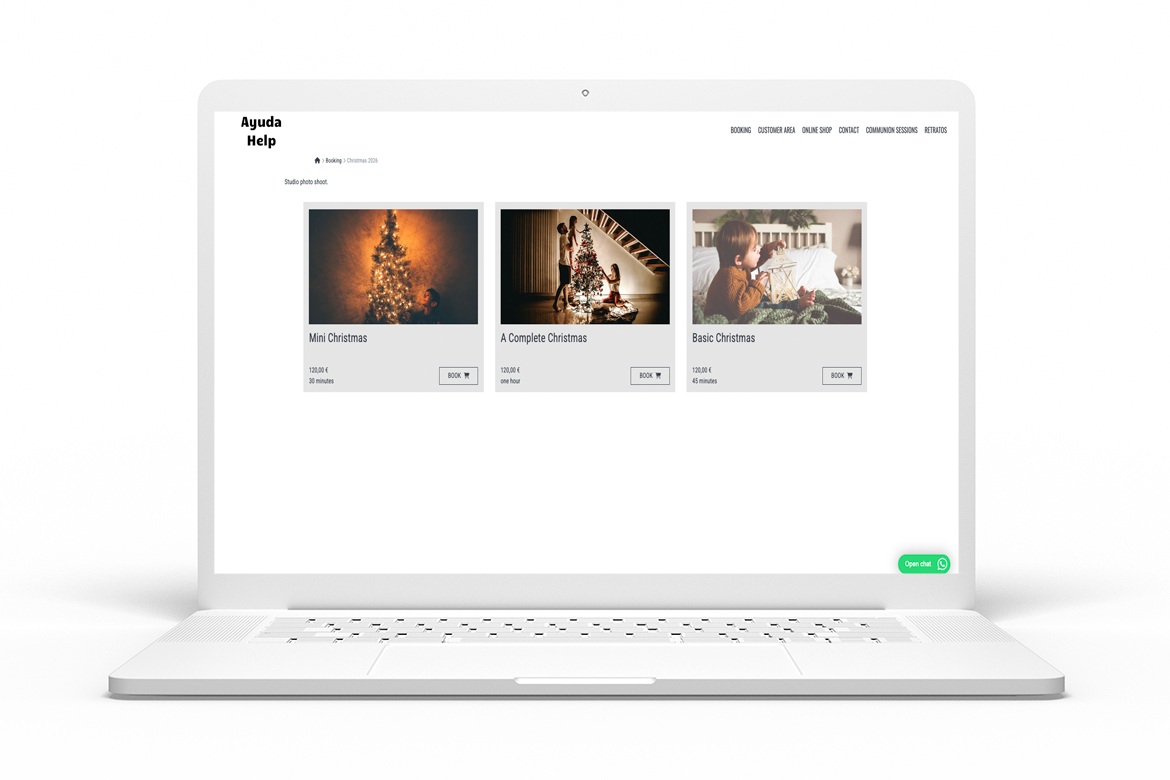
Each package you sell is a session type. Three options are usually enough: an entry-level package that attracts clients, a midrange option that sells best, and a full package that increases your average sale.
| Package | Suggested duration | Who it’s for |
|---|---|---|
| Christmas Mini | 20–30 min | Clients who want a photo for their Christmas card |
| Christmas Basic | 45 min | Families with young children |
| Christmas Full | 1 hour or more | Large families, several groups, or a custom set |
(These durations are examples. Adapt them to the way you work.)
To create your first session type:
- Go to Control panel / Booking / Session types and click + New session type.
- Enter a title (“Christmas Mini”) and a short description of what’s included: duration, number of delivered photos, and whether there’s a set.
- Enter the session price and the booking price, which is the deposit paid when booking (we’ll cover this in step 4).
- Under Times, set the duration, start-time interval, break between sessions, and minimum advance notice.
- Choose a color so you can recognize each package at a glance in your calendar.
- If you wish, assign a gallery template and a contract template.
- Add a Christmas cover image and save.
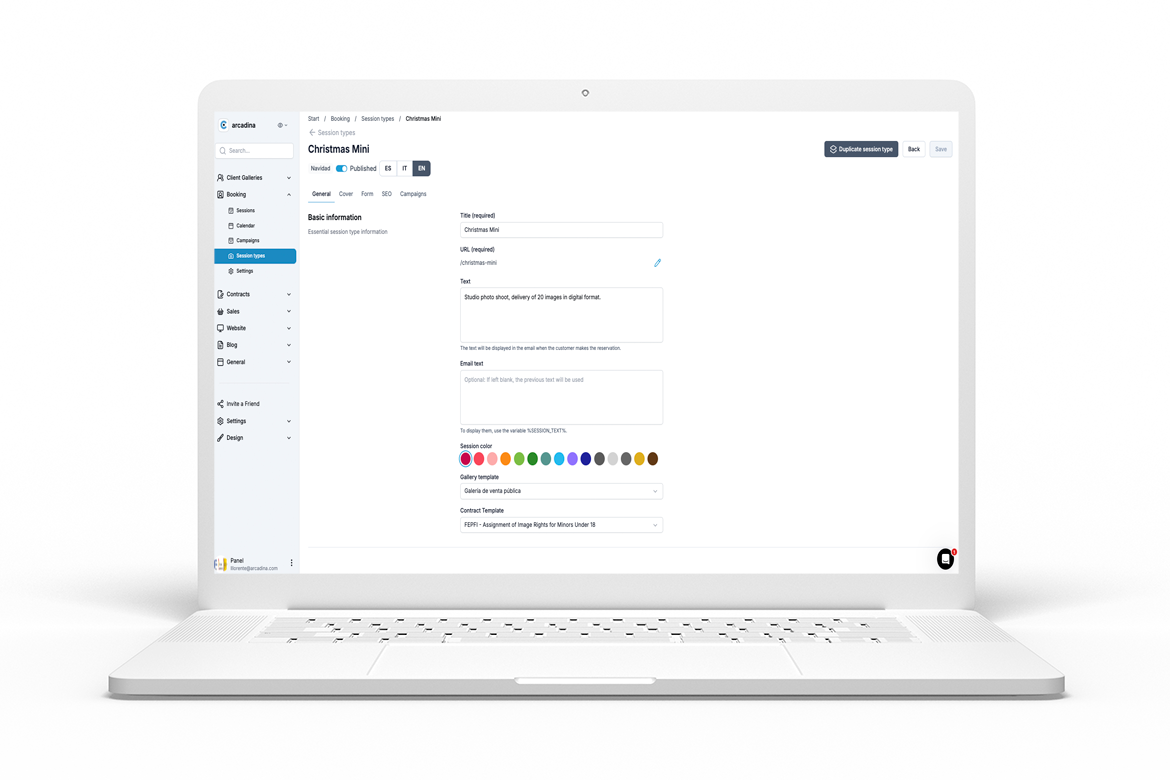
Don’t start from scratch for the other two packages. Click the three dots next to the session type and choose Duplicate. Then change the title, price, and duration. Remember: the copy is created unpublished, so you’ll need to publish it.
About timing: the break between sessions gives you time to reset the set or welcome the next family (you can choose anything from no break to 2 hours). The interval determines how frequently start times are offered.
You’ll find an explanation of all the fields in Booking. Session types.
Step 2. Create your “Christmas 2026” campaign and its booking window
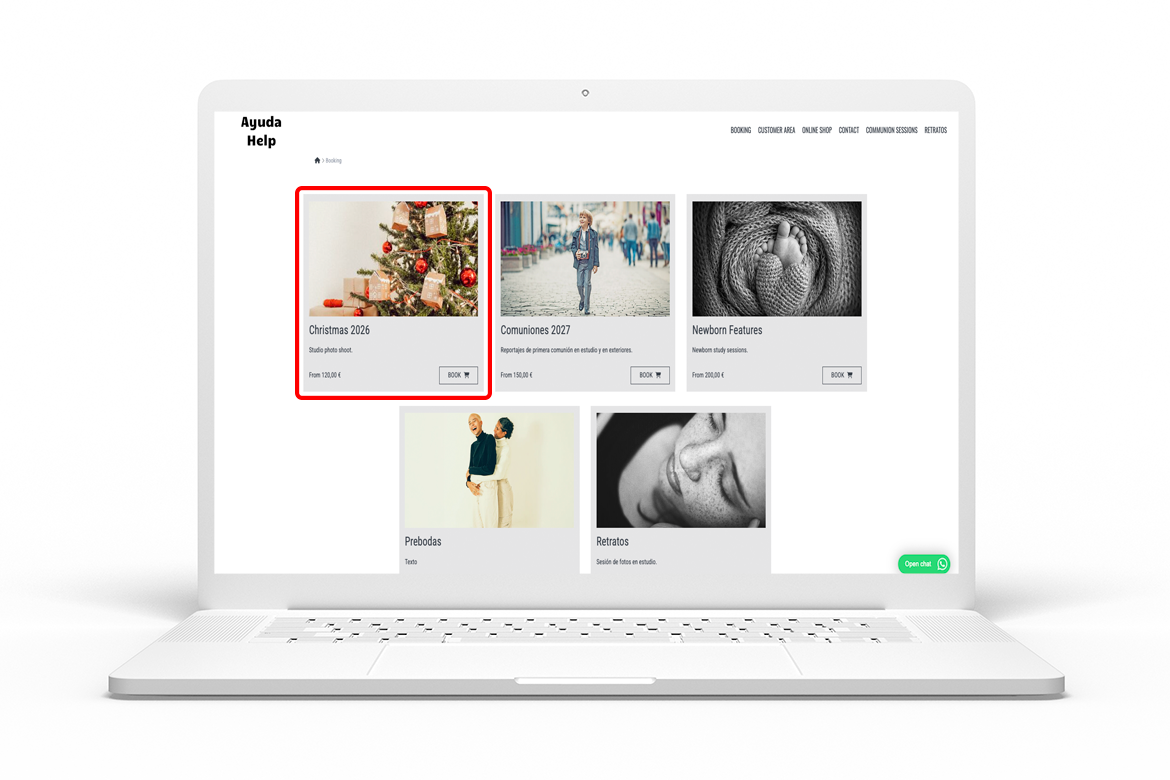
The campaign brings your three packages together on one page with its own URL. This is the page you’ll share with clients.
- Go to Booking / Campaigns and create a new campaign.
- Under General information, enter the title (“Christmas Sessions 2026”), a short URL that’s easy to share (such as /christmas), and a description explaining what each package includes, where the sessions will take place, and when bookings close.
- Set the booking window: the opening and closing dates for bookings. If you leave the end date blank, the campaign stays active until you disable it.
- Assign your three session types to the campaign. You can do this in the Campaign field of each session type.
- Under Images, upload a cover image and separate desktop and mobile backgrounds.
- Complete the SEO section with a title and description that include your city, such as “Christmas photo sessions in Austin.”
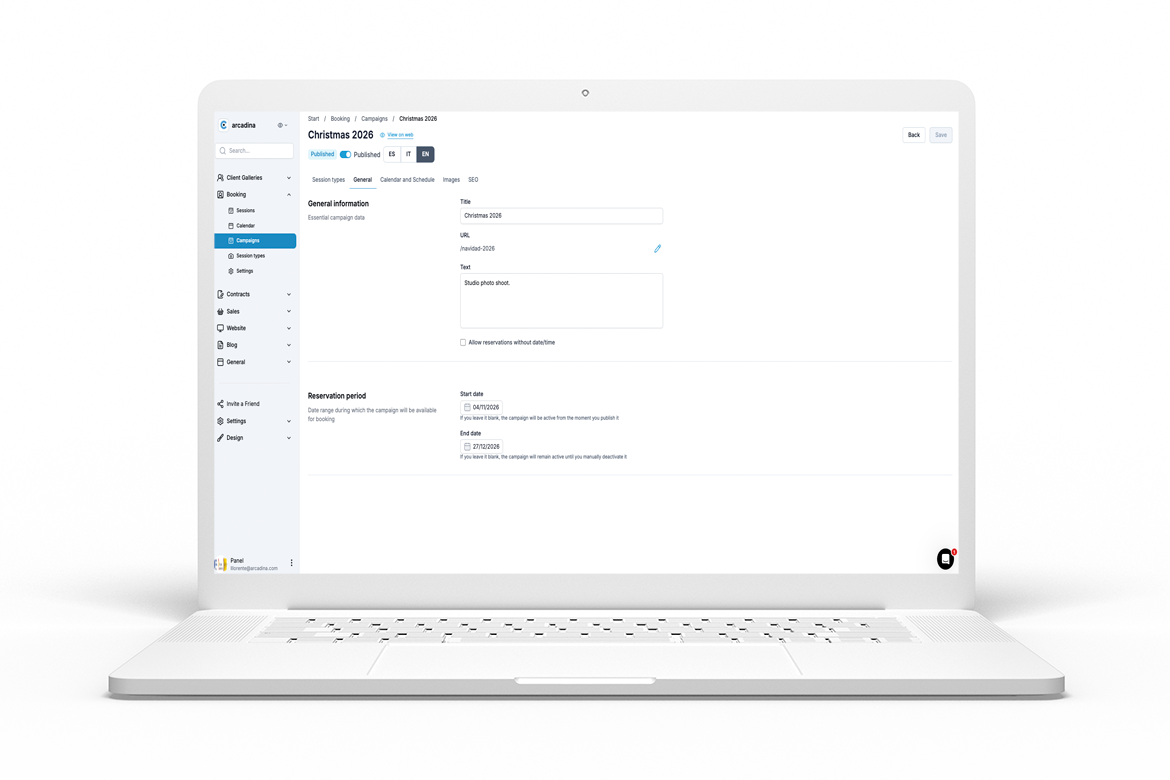
The booking window and the session dates are different. The booking window defines when clients can make a booking—for example, November 3 through December 15. You’ll define the actual session dates in the next step. This lets you open bookings in November for sessions in December.
Tip: upload your own images from previous Christmas sessions. They sell your work much better than stock photos. Check the campaign on a phone, too, since most clients will book from theirs.
Under Booking / Settings / Campaign, you can choose whether to display a “From…” price (the lowest-priced package) and the “Book” button. Find the full explanation in Booking. Campaigns.
Step 3. Choose your session dates and hours
Your Christmas schedule probably won’t match your usual studio hours. You may concentrate sessions on a few weekends or open on a special Sunday. Configure this in the campaign’s Calendar and schedule section.
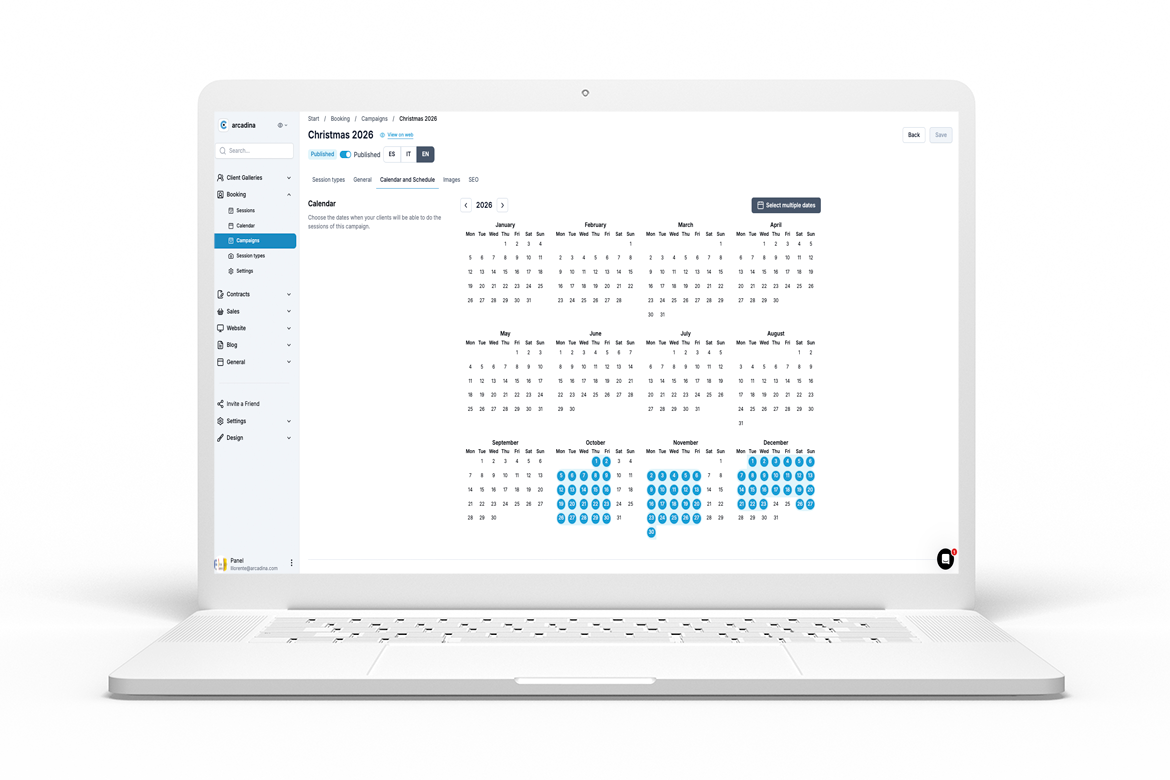
- Select the specific days when you’ll offer sessions—for example, selected weekends in late November and December. If you don’t select any, clients can book on any day within the booking window.
- Set the hours for each day of the week. Use + Add to create several time slots, such as 10:00 a.m.–2:00 p.m. and 4:00–7:30 p.m., leaving a lunch break.
- Remove days you don’t work using the trash icon.
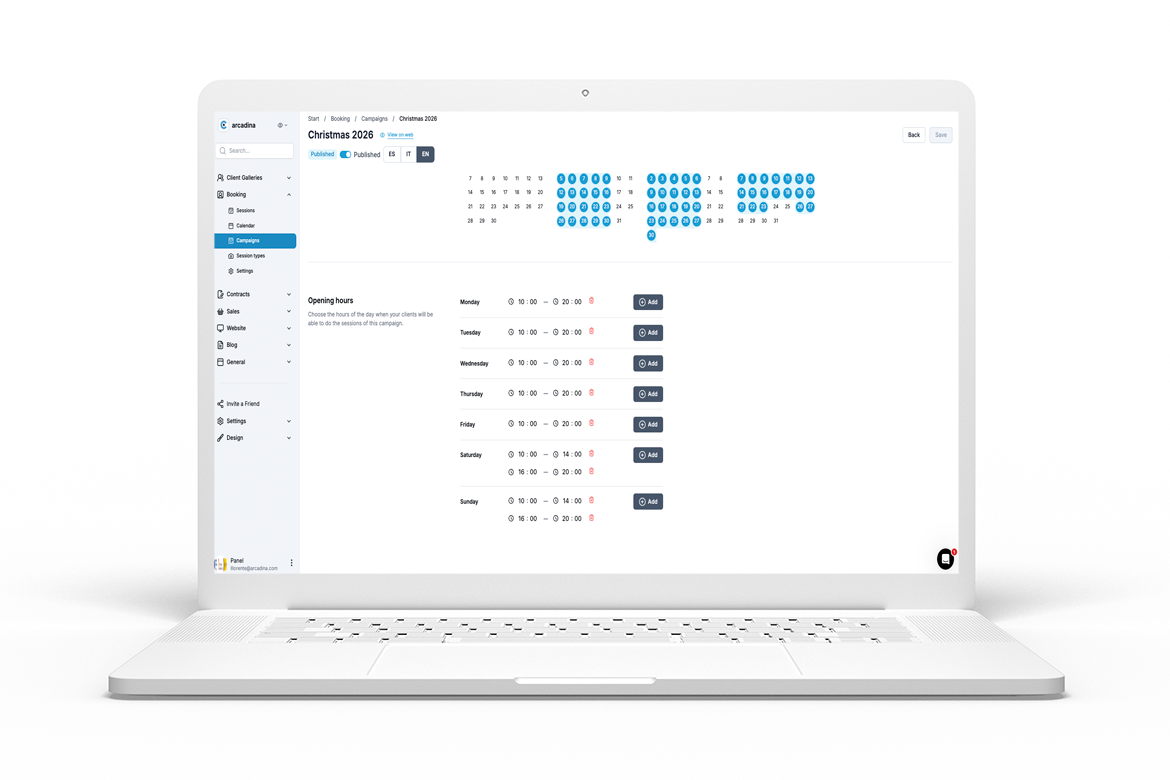
Booking calculates available slots automatically using the duration, interval, and break for each session type. If a package lasts an hour and only 40 minutes remain before closing, that slot won’t be offered.
If you have a wedding, another event, or a day off, block it under Booking / Calendar using Block dates. Choose the start and end dates and times, or select the entire day. Clients will see those times as unavailable.
Running several campaigns at once?
If you’re also offering another campaign during the same period, such as maternity or newborn sessions, review their availability together and test the booking process before launch.
Tip: connect Booking to your Google Calendar. You’ll see each Christmas booking on your phone as soon as it comes in. Follow the steps in Booking. Calendar.
Step 4. Collect a deposit when clients book
A deposit helps protect you against December no-shows. Clients who pay €20 or €30 when booking are more likely to attend, and if they don’t, you won’t lose the entire value of that slot.
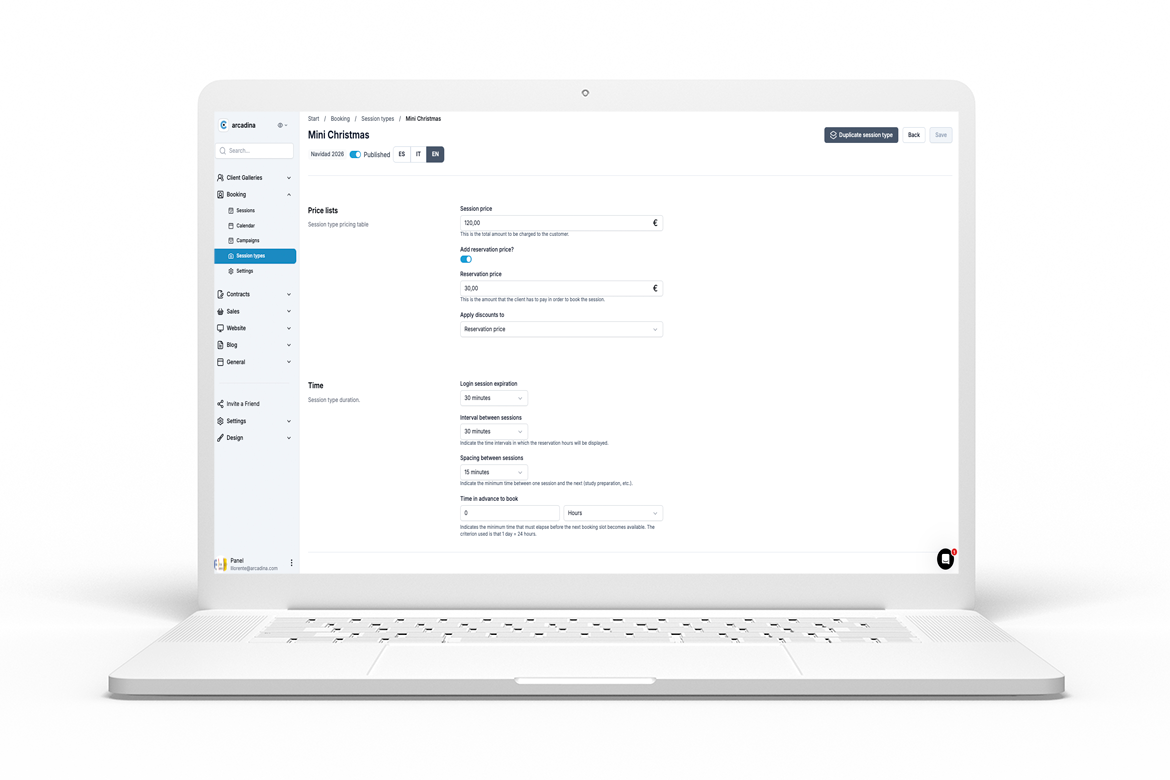
Set it for each session type in the Booking price field:
- Session price: the full package price—for example, €120.
- Booking price: the amount clients pay when booking—for example, €30. Collect the balance on the day of the session or when delivering the photos.
If you prefer to collect the entire package price upfront, enter the same amount in both fields.
Online payments or bank transfers
With a card payment or PayPal, the booking is paid immediately and the session is confirmed automatically.
With a bank transfer or cash payment, the booking remains pending payment. Clients have the deadline you’ve set under Booking / Settings / Sessions (1–30 days) to pay. During the Christmas season, a short deadline of 1 or 2 days helps avoid holding slots for bookings that never get paid.
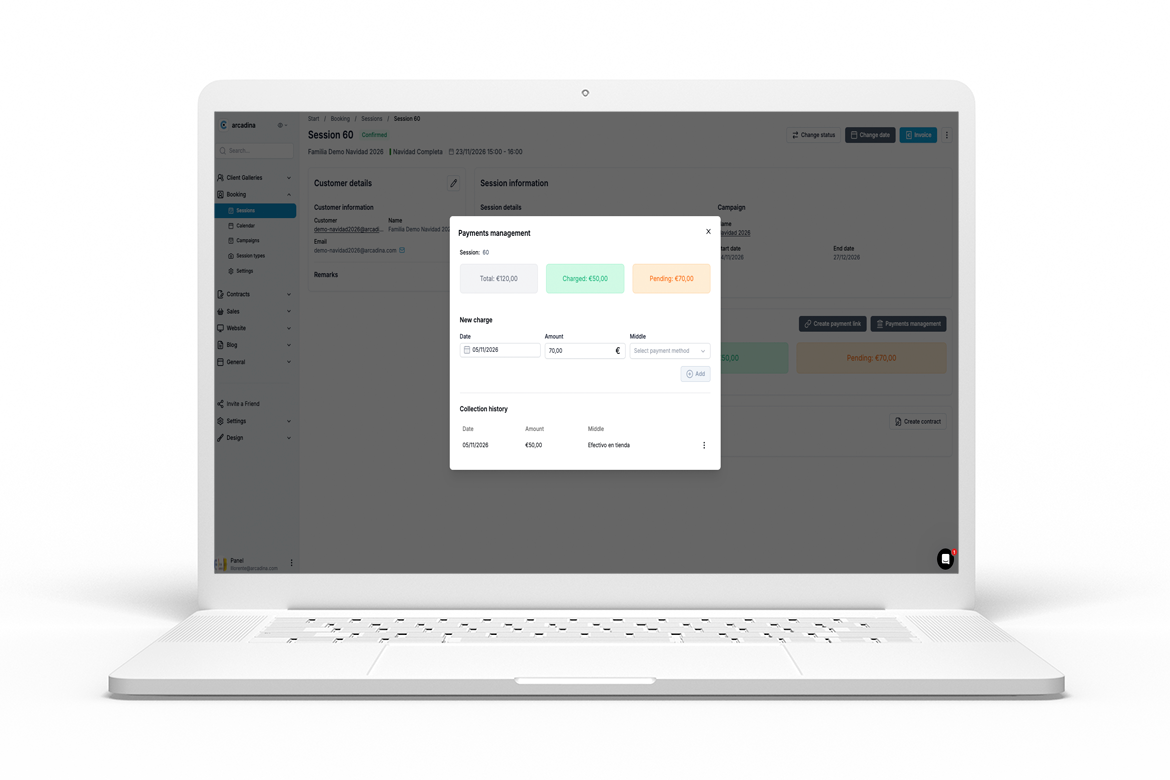
When the bank transfer arrives, open the session and record the payment to confirm it. You can also record the remaining balance from the session itself when you receive it.
Tip: clearly explain in your campaign whether the deposit is refundable in the event of a cancellation and how much notice is required. This helps prevent misunderstandings. Ideally, include it in your session contract as well.
Your returning clients are often the first to book. Give them a few days of early access before opening the campaign to everyone. They’ll feel appreciated, and you can fill your best slots without spending on ads.
How to offer early access
- Set the start of the booking window a few days before your public launch.
- Don’t announce the campaign in your website menu or on social media yet. Share the link only with your existing clients.
- If you want to reward their loyalty, create a discount code for them.
- After those first few days, announce the campaign on your website and social media.
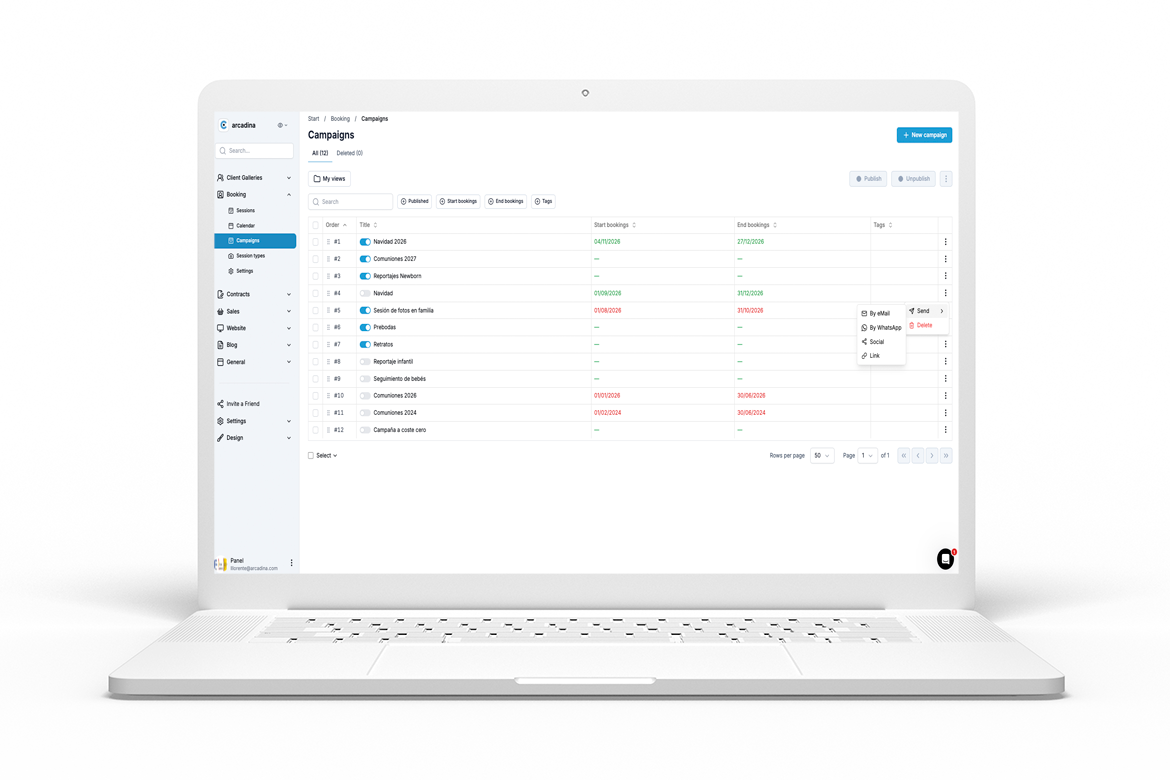
From the campaign list, click the three dots and choose Send. You can share it by:
- Email;
- WhatsApp;
- Social media;
- Link, to paste wherever you like: your Instagram bio, a story, or a group.
Arcadina suggests a message that you can customize before sending.
Tip: before sharing the link on WhatsApp, send it to yourself. Check that the preview image and title look right. They come from the campaign’s cover image and SEO settings.
A simple communication schedule
| When | What to send |
|---|---|
| First week of November | Early access for existing clients by email and WhatsApp |
| Second week of November | Public launch on your website and social media |
| Mid-campaign | “Only a few slots left,” with specific available dates |
| Final week | A final reminder before bookings close |
For ideas for your messages and set design, read our articles on planning your Christmas photo sessions and 5 tips and 10 examples for creating the best Christmas photo shoots.
Step 6. Automate confirmations, reminders, and photo delivery
Once your campaign is set up, much of what happens after each booking can run automatically. Three settings can take care of most of your December messages.
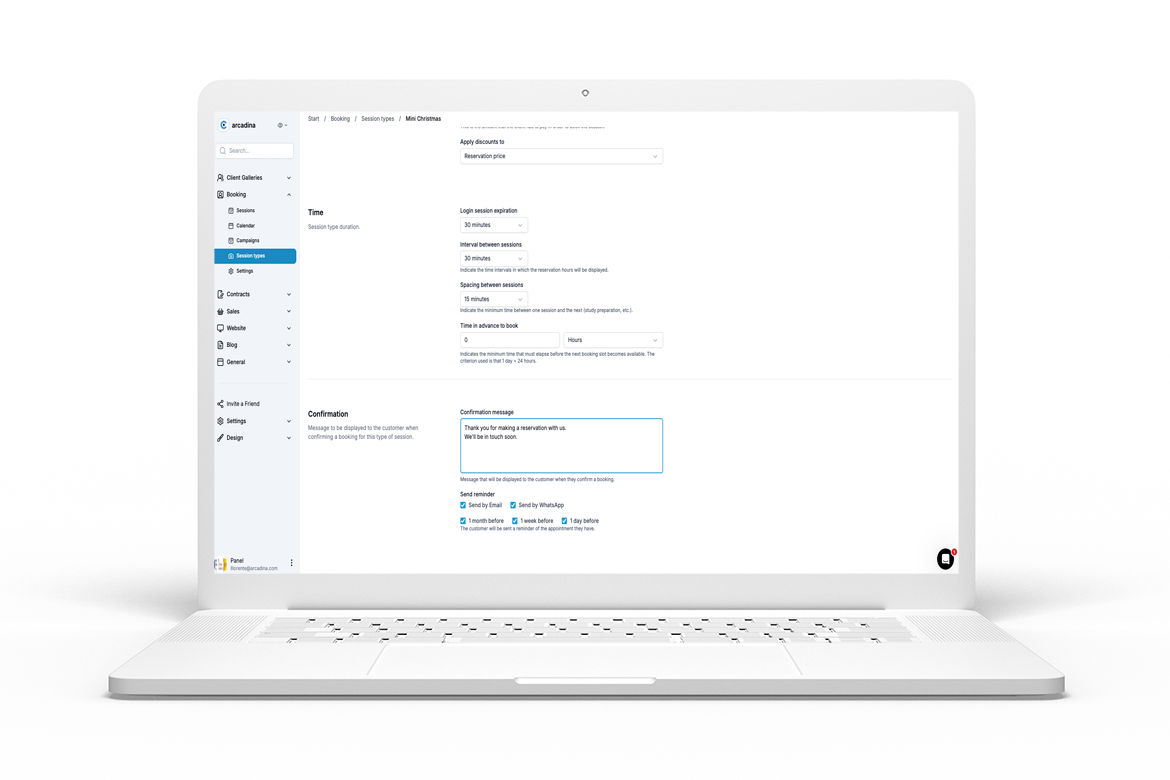
1. Confirmation message. In each session type, under Confirmation, include what clients need to know: your address, parking details, what to wear, and whether pets are welcome. You can also use the Email text field.
2. Reminder before the session. Enable Send reminder in the session type. Prepare the message under Booking / Settings / Texts, where the Variables button lets you add the client’s name, date, or time.
3. A form for the details you need. If you want to ask how many people are coming or the children’s ages, create a form under General / Forms and assign it to the session type. Clients fill it out when booking.
After the session: the gallery
If you assigned a gallery template to the session type, each booking creates the client’s private gallery. All you have to do is upload the photos and let them know.
This is your second sales opportunity. In the gallery, clients can choose their favorite photos, purchase extra images beyond their package, or order prints as gifts. A framed print makes a wonderful Christmas present.
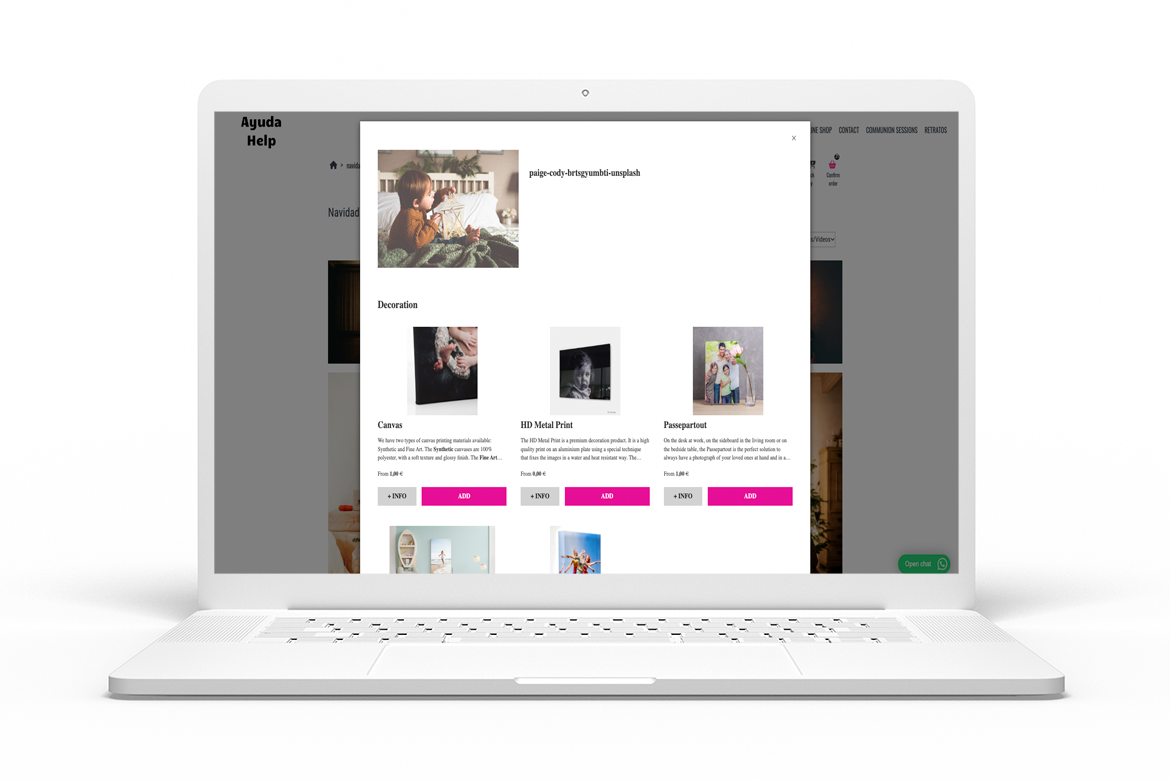
Learn more about private galleries and selling photos and prints.
7 common mistakes—and how to avoid them
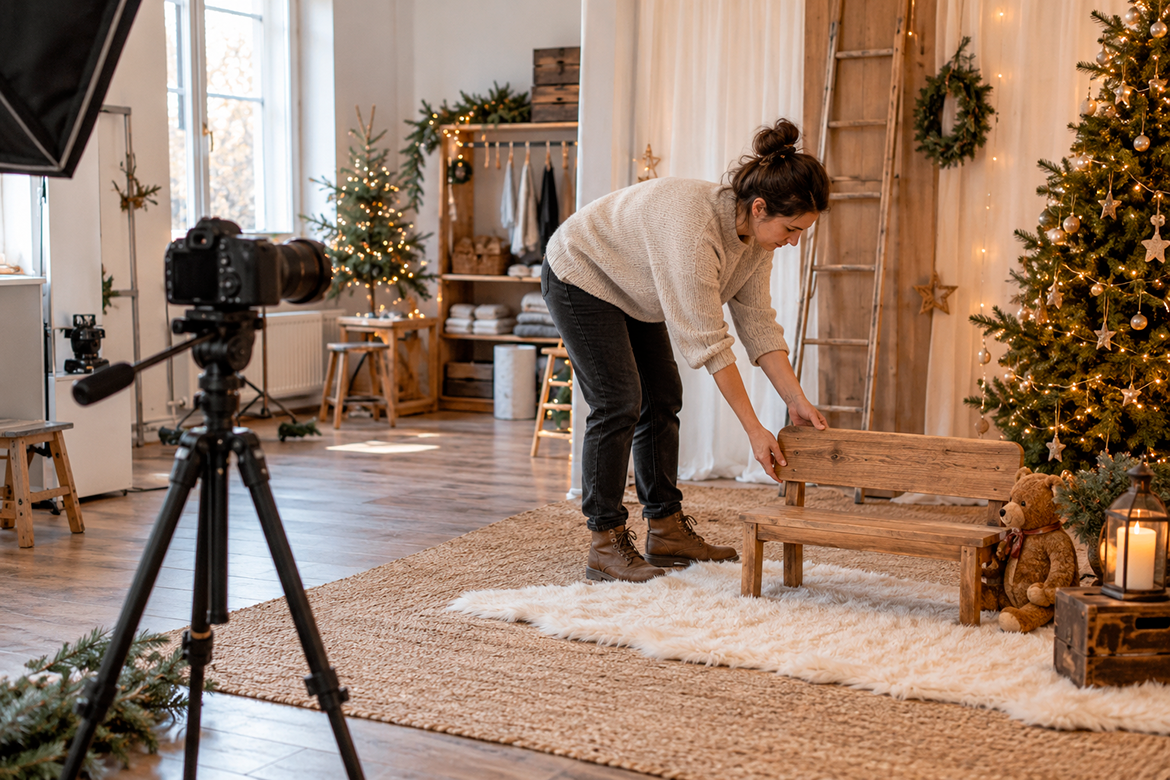
These are the issues we see most often in our clients’ Christmas campaigns each year.
- A payment method doesn’t appear at checkout. Usually, it hasn’t been enabled for Booking under Sales / Payment methods. Check before launching.
- Unpaid bank-transfer bookings hold up slots. Shorten the payment deadline under Booking / Settings / Sessions and record each payment as soon as it arrives.
- Times you didn’t intend to offer appear. Check the campaign’s schedule, not just the general one. Remember that if you don’t select specific dates, clients can book on any day within the booking window.
- A long package is offered late in the day. Booking offers a time if the package fits before closing. If you don’t want to offer the full package in the afternoon, shorten that session type’s hours or create a separate session type with its own schedule.
- You forget to publish a duplicated package. A copied session type is created unpublished. Check the list before sharing the campaign.
- The WhatsApp preview has no image or an odd title. Upload a campaign cover image and complete its SEO settings. Then test the link by sending it to yourself.
- You don’t review the campaign on a phone. Most bookings come from mobile devices. Open it on yours and complete a test booking from start to finish.
The test that catches almost everything: before sharing the campaign, make a booking as if you were a client. You’ll see the packages, available times, cart, payment, and emails exactly as your clients will. Then delete the test session from your calendar.
Your Christmas campaign, ready in an afternoon
If you’ve followed these six steps, your campaign is ready to take bookings:
- Three clear packages, each with a price and deposit;
- Only the dates and times you choose;
- Early access for returning clients;
- Automatic confirmations and reminders;
- A gallery ready for delivery and additional sales.
The time you used to spend replying to messages is now time you can spend taking photos.
And when Christmas is over, duplicate your session types and reuse the campaign for the next season: Valentine’s Day, spring family sessions, or back-to-school photos.
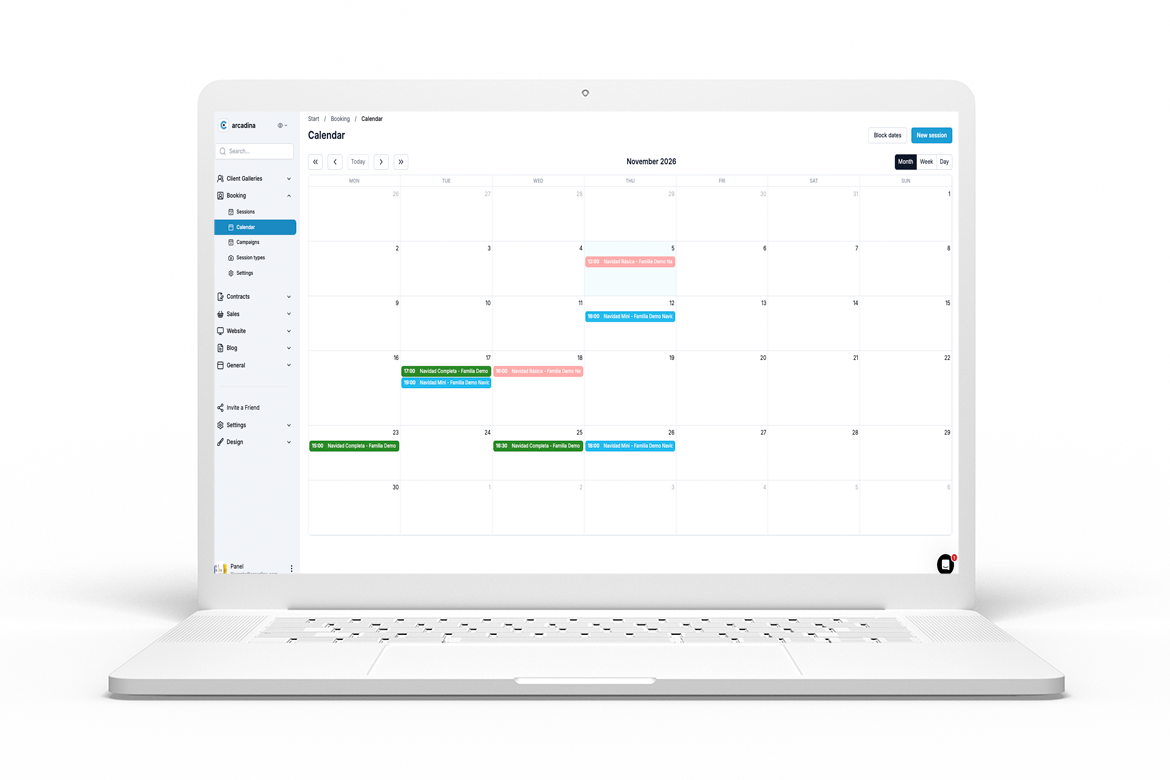
Don’t have Arcadina yet? Try it free and set up your Christmas campaign with online booking, payments, and galleries in one place.
Online diary · Bookings · Reminders
Let clients book a session without calling you
Real-time availability · Fewer WhatsApp threads · Bookings confirmed on their own